Did you share a room with a sibling growing up? I always had my own room, but I was also quite a bit older than my brother and sister so it never really made sense for us. My boys are almost 4 years apart and when we first moved into the new house we had them in separate rooms. Our oldest, however, starting going through a “thing” where he was afraid to be alone in his room. After a few sleepless months it was a no brainer to me to move him into a room with his brother. So we had a chat about it and thankfully he LOVED the idea.
Since I carry the same color palette throughout the house it was a really easy transition to combine the rooms. I wanted to make sure to incorporate items from both rooms.
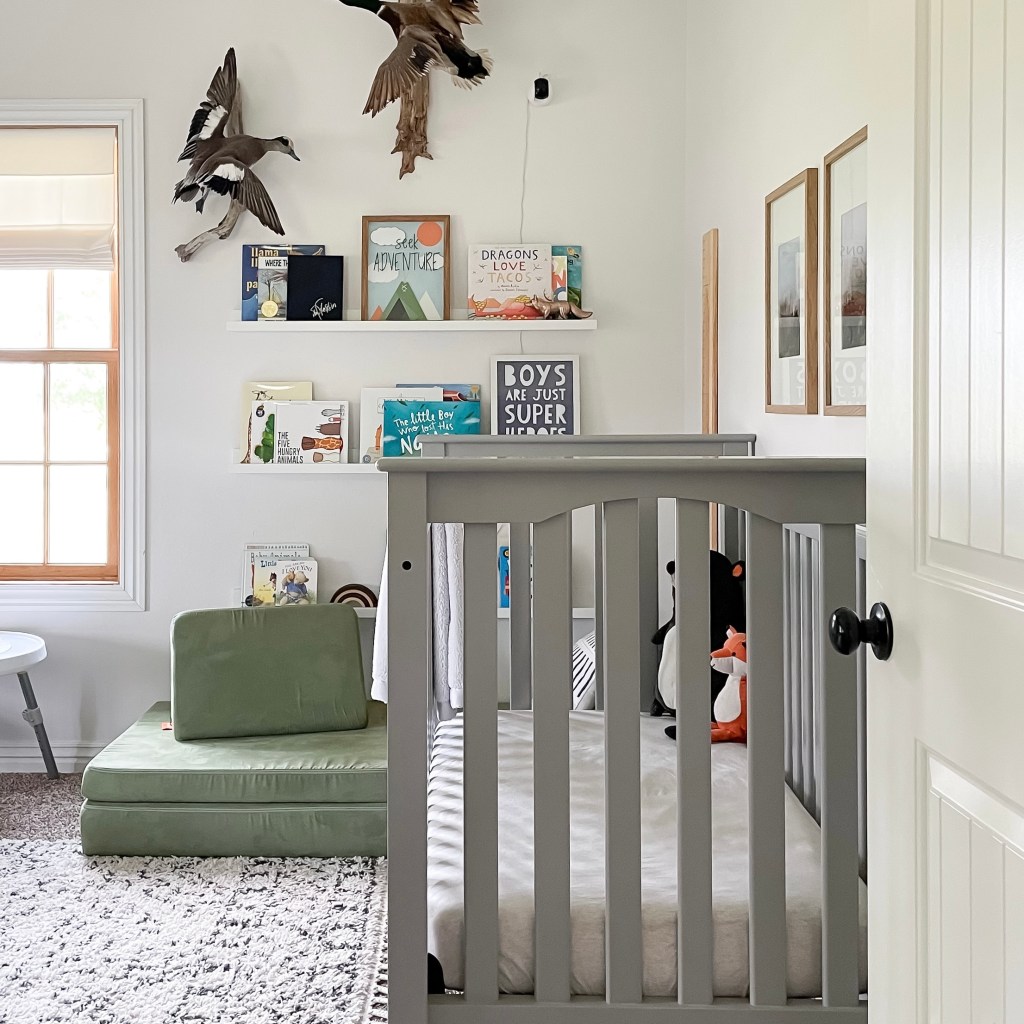
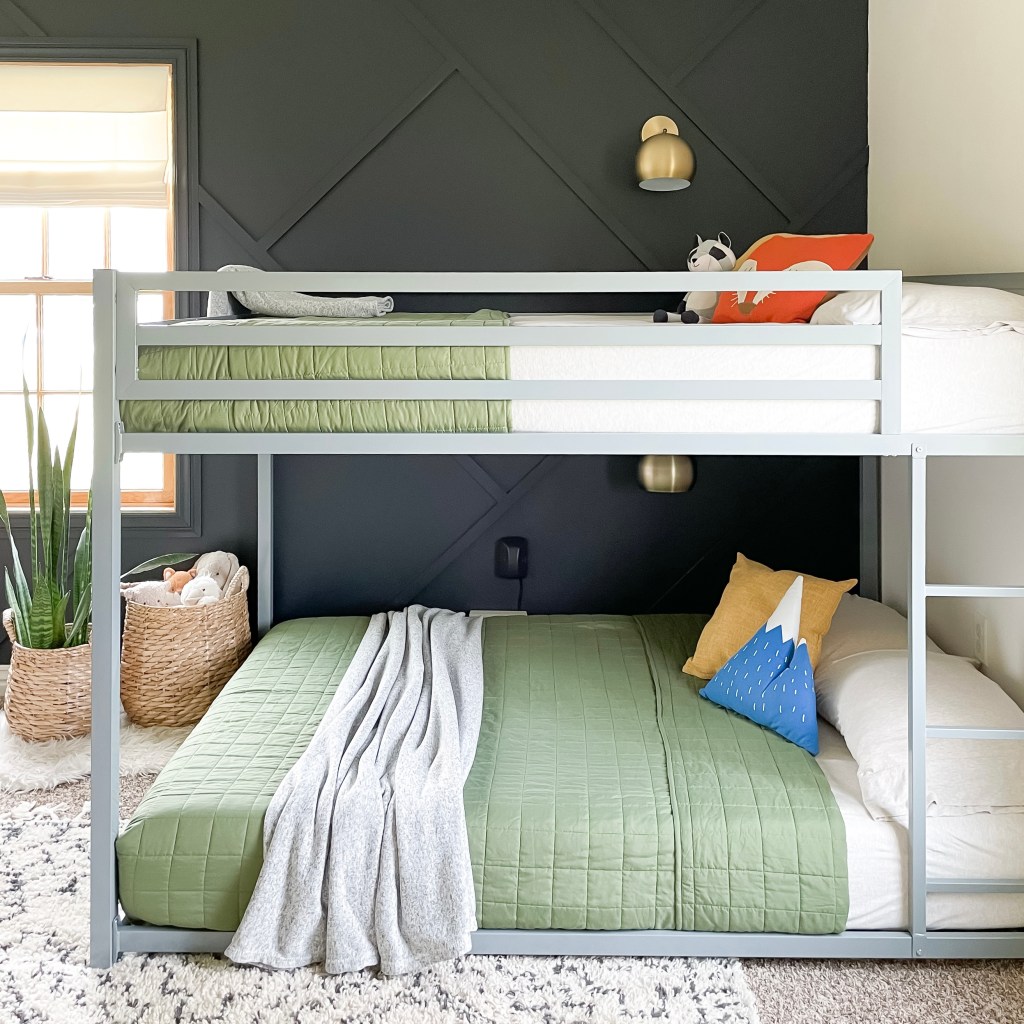
The biggest purchase we made was a set of bunk beds. For now we have a bed and a crib. Our youngest needs containment – for as long as possible. BUT before we know it, he’ll be free to roam and sleeping in a big boy bed so bunk beds was the logical choice. We love this full over full bed from Wayfair. Once the crib leaves the room I’ll probably replace it with a little desk.
The other need we had was a dresser big enough for both of them. We moved the Ikea dresser into the other bedroom to make room for the bunk bed. It was too big for the spot we had available. We ordered this really cute navy dresser from Amazon. I will say I’m not impressed with the quality. I’ve had to glue the drawer fronts back on a couple of times. It’s cute but we’ll probably have to replace it in the near future.
My favorite feature are the wall sconces! We cut the cords and did the puck light hack so they would both have little night lights. No wiring required and they look SO good on the black wall.
Overall I’m so happy with how the room came together and the boys absolutely LOVE being in a room together. If you’re on the fence about it: 10/10 recommend it! The morning conversations that we hear through the monitor are my absolute favorite (Almost 6 and almost 2 – you can imagine). I know they’ll eventually probably want their own spaces, but I hope that’s not any time soon.
Paint colors: Walls – Cameo White – Behr, Accent Wall – Dark Secret – Behr
This page may contain affiliate links, which means I will receive compensation if you click through and make a purchase.
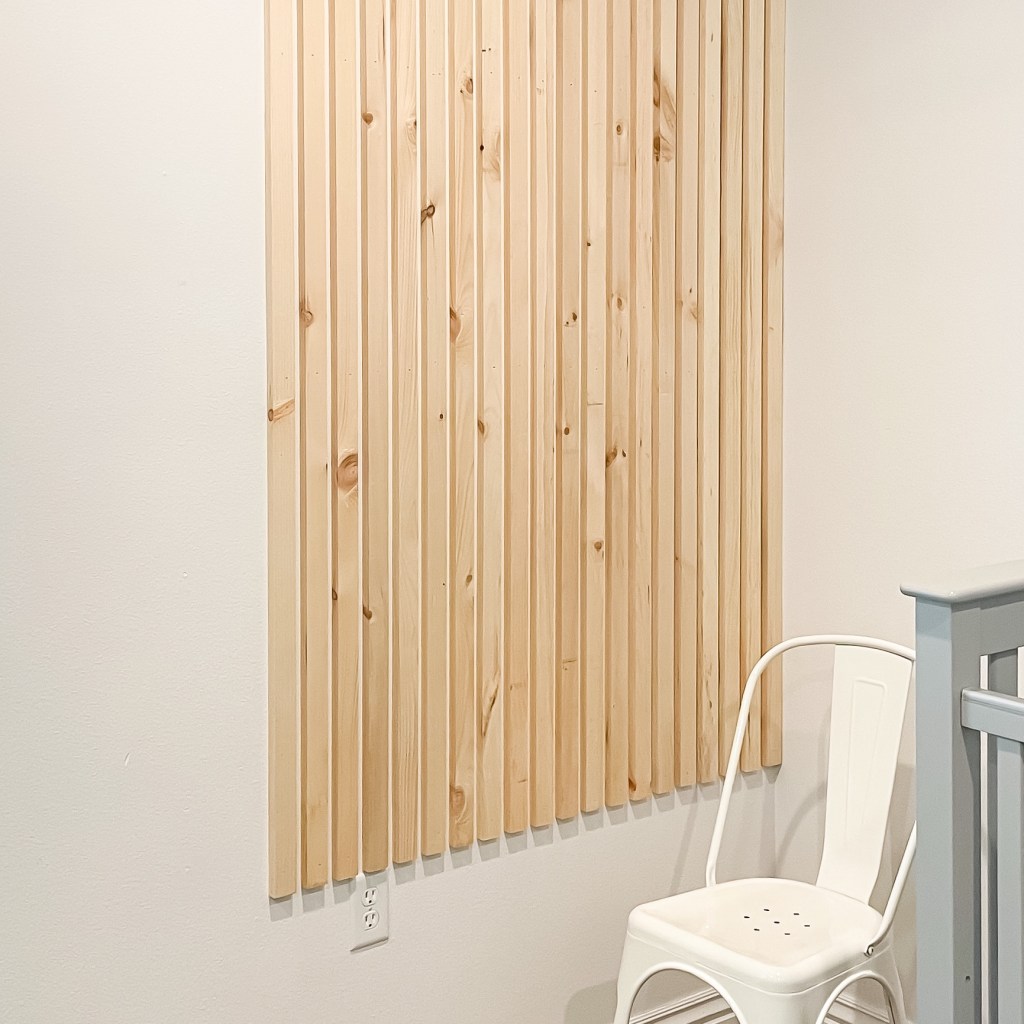
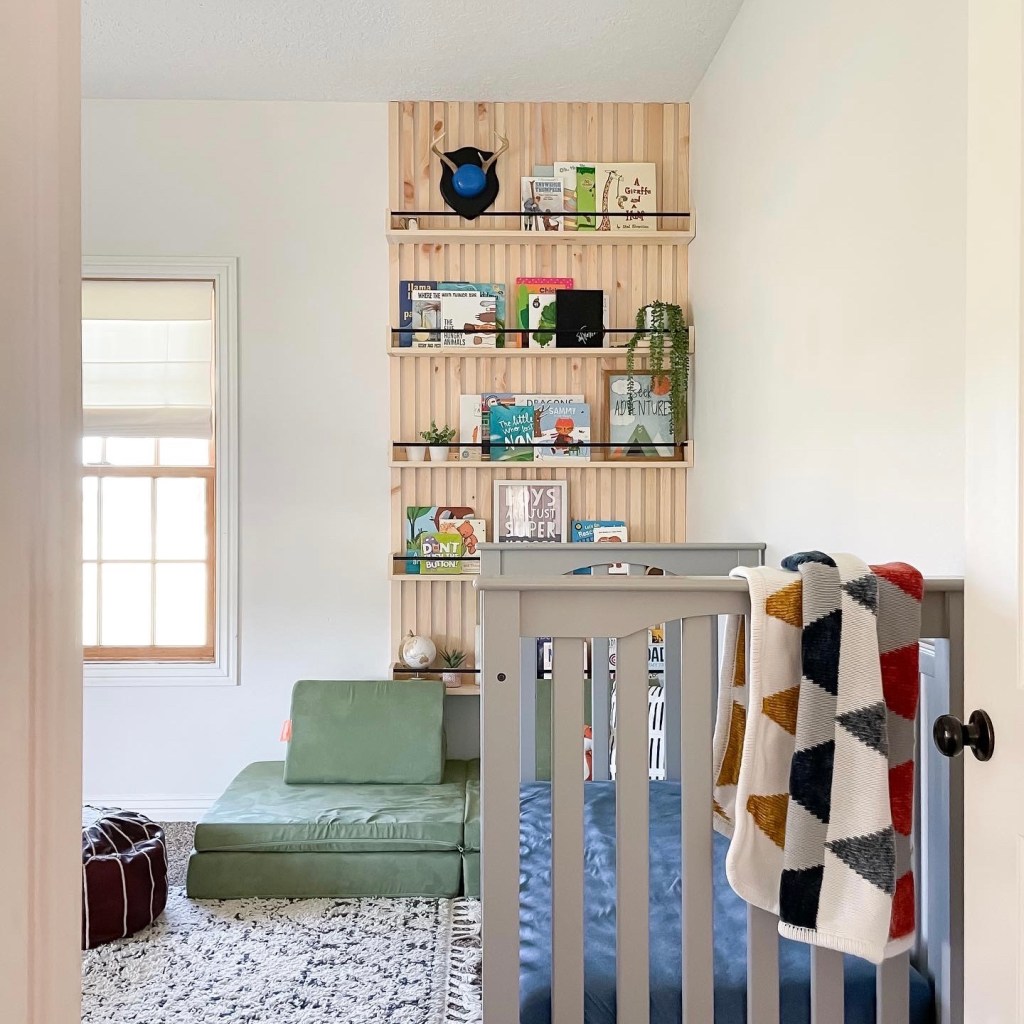
My kids have approximately 35 million books…which I’m certainly not complaining about. They both love to read stories – but it does pose a bit of a storage problem. Originally, I had hung some Ikea picture ledges in their room but it seemed like there was never enough room. I started brainstorming on what we could do – then I came across Kim from@xomyhome‘s post about some slat wall shelving she did for her kids. I absolutely LOVED the look of them. You can see her version here.
So after studying what she did, I got to work on a plan. If you’d like to see my process, I have a bookshelf highlight saved to my instagram.
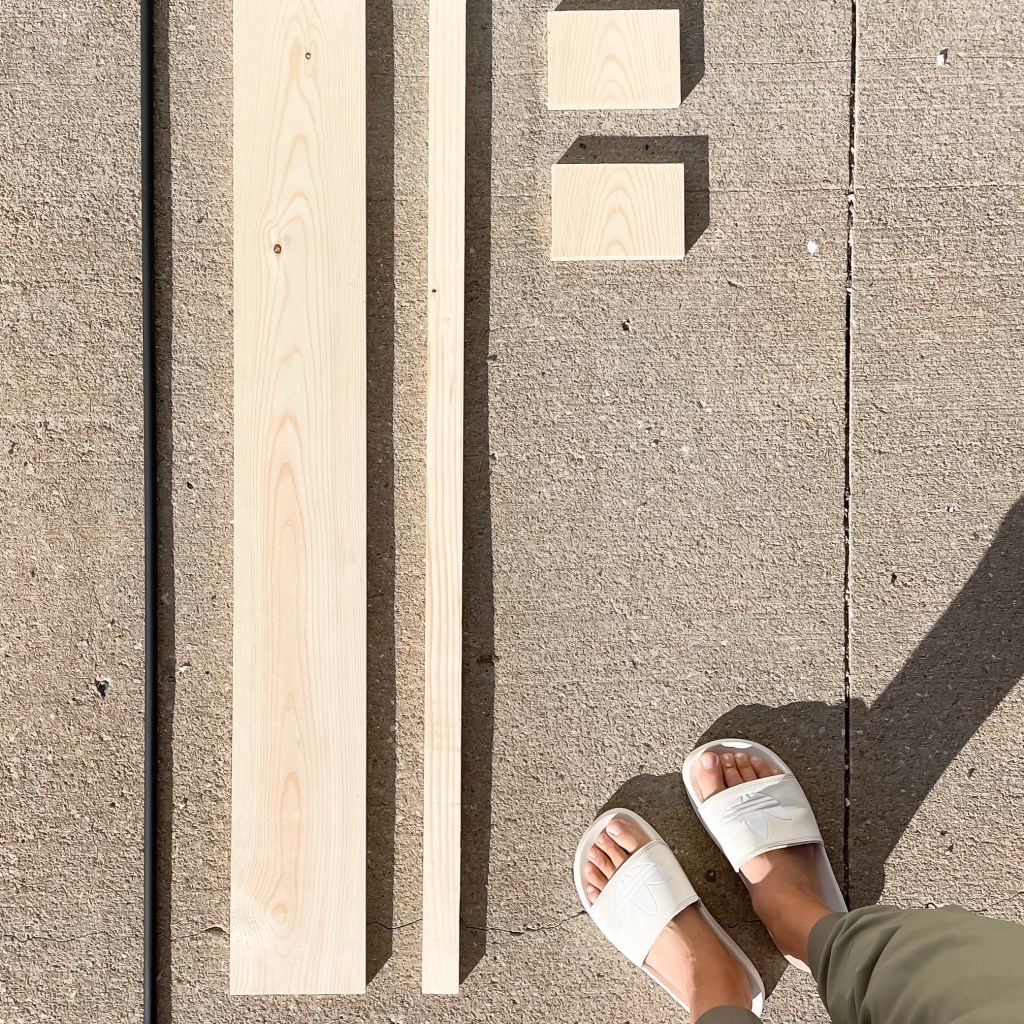
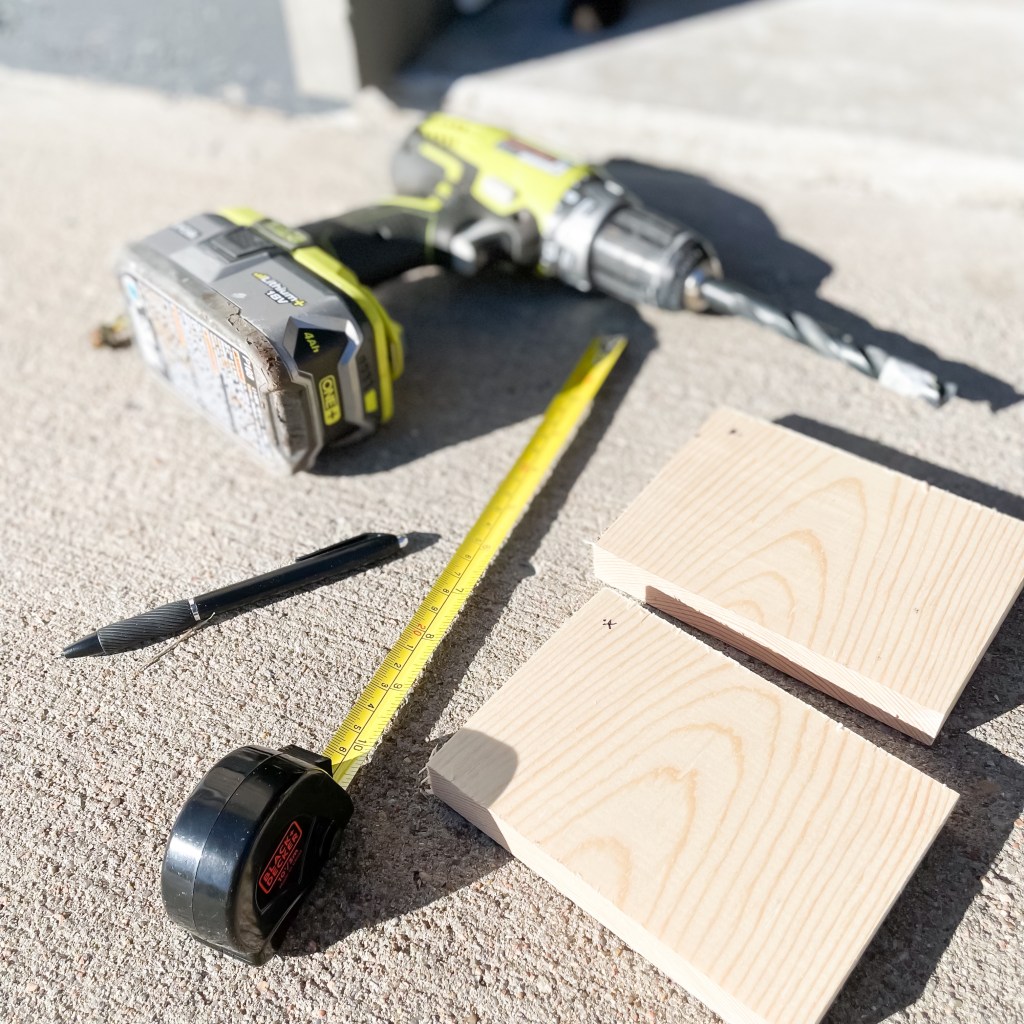
Here’s what I used for this build:
24 1x2x8 boards
3 1x2x6 boards
5 48″ 1/2″ dowels
Matte black spray paint
Wood Glue
Wood filler
Mitre Saw
Brad Nailer
Drill
Impact Driver (optional)
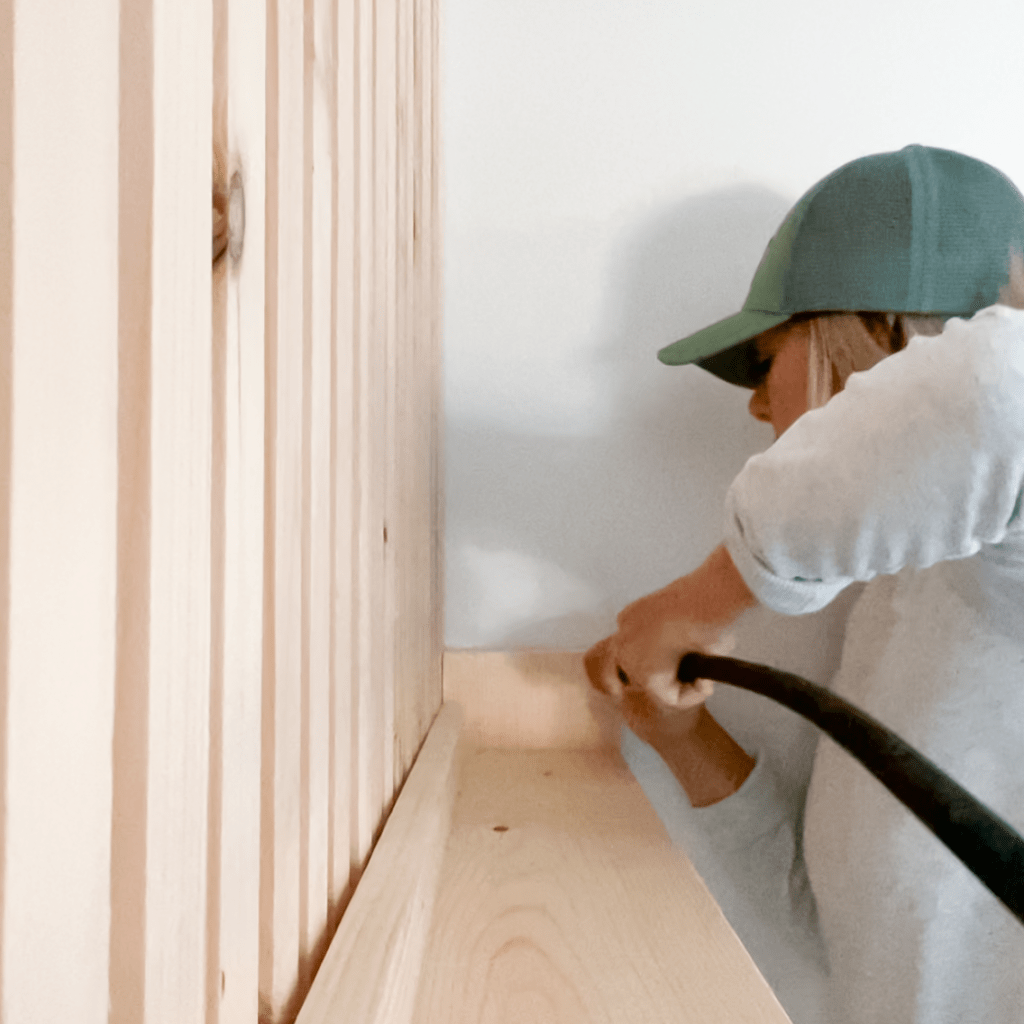
To do the slat wall I first located my studs in the wall. I made sure that at least 2 of my slats were attached to the studs. This is important because these will support the weight of the bookshelves. After some math, I figured out that I could space each slat 3/4” apart. Since my 1×2 boards are 3/4” thick, I used one as a spacer.
I used a brad nailer to attach the slats to the wall. Put a few screws into the slats that are positioned over your studs (try to place these so they’ll be hidden by your shelves – or you can counter sink them and use plugs to cover them up). Make sure you go back and fill your nail holes with wood filler for a finished look.
Now it was time to build the shelves. These are relatively simple to assemble as long as you get your cuts right. First I trimmed my boards to the length needed. I then I attached a 1×2 to the back of my 1×6 shelf board with brad nails and a couple of screws along the bottom of the shelf. This is what I’ll use to attach the shelf to the wall.
Before you attach the sides of the shelf, you need to mark and drill pilot holes for the front support. I didn’t want to drill all the way through the board, so I placed a piece of tape 1/2” from the end of my 1/2” drill bit so I knew where to stop. Once you have your pilot holes, you can use the brad nailer to attach the sides. Don’t panic if the shelves aren’t perfect. Sand down the shelves to fix any uneven joints and use wood glue or wood filler in any spots where the boards don’t sit flush.
Next, you’ll want to attach your shelves to the wall. Locate the slats that are attached to your stud and make sure you screw the shelves to those first. Then add a few brad nails for extra support. Once your shelf is on the wall you can add your front support. I sprayed mine black for a little contrast. Trim your dowel to size, then place it in one of the pilot holes. You should be able to bend it just enough to fit it into the other side.
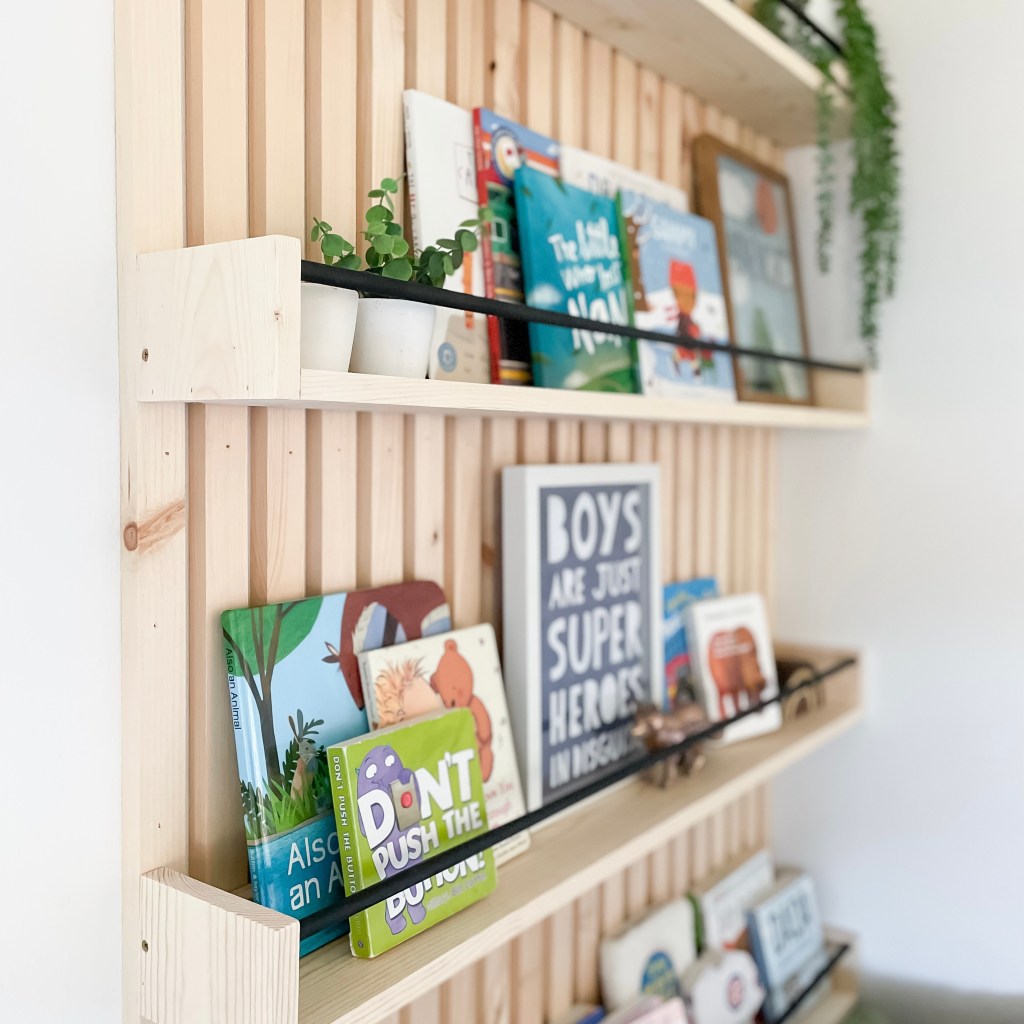
Add your books and any other fun decor and you’re done! These shelves are the focal point as you walk into my boys’ room and I am obsessed! Plus now they can find all their favorites easily. If you try this project, I’d love to see!
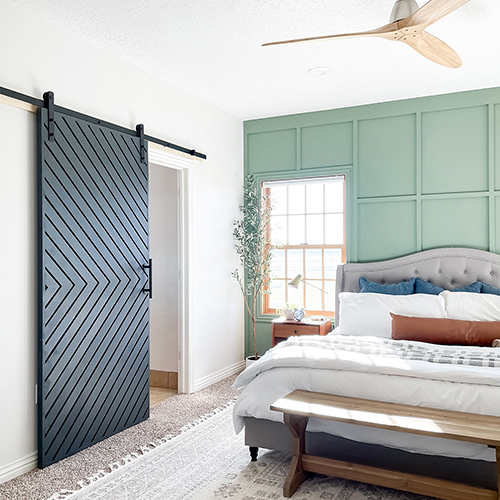
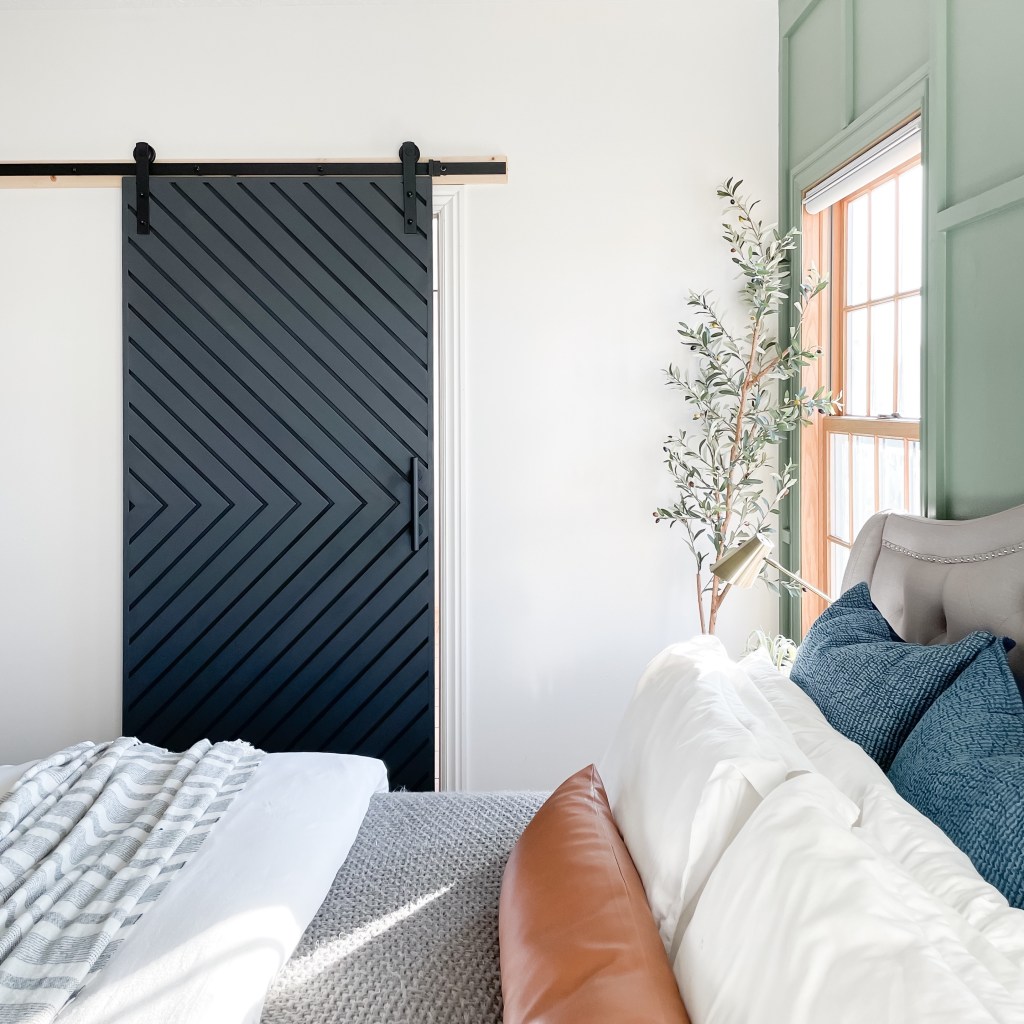
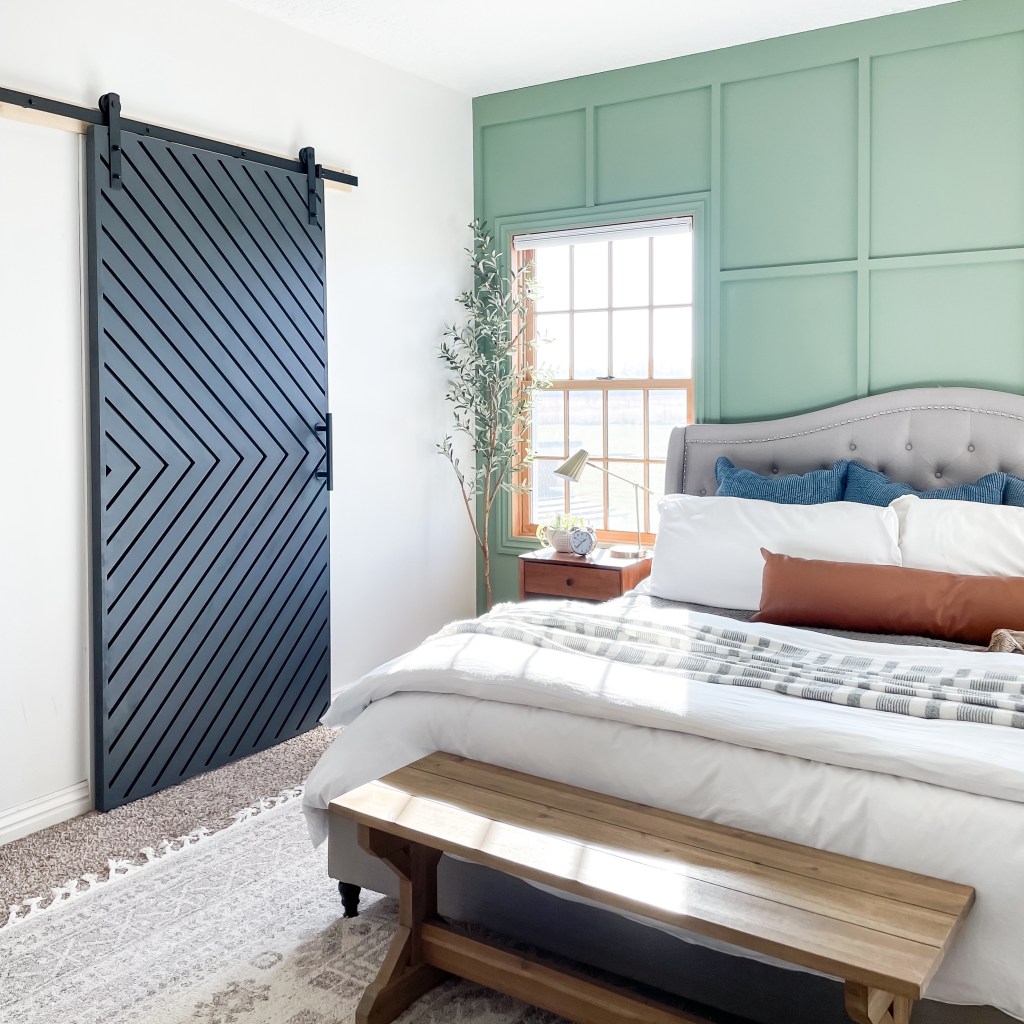
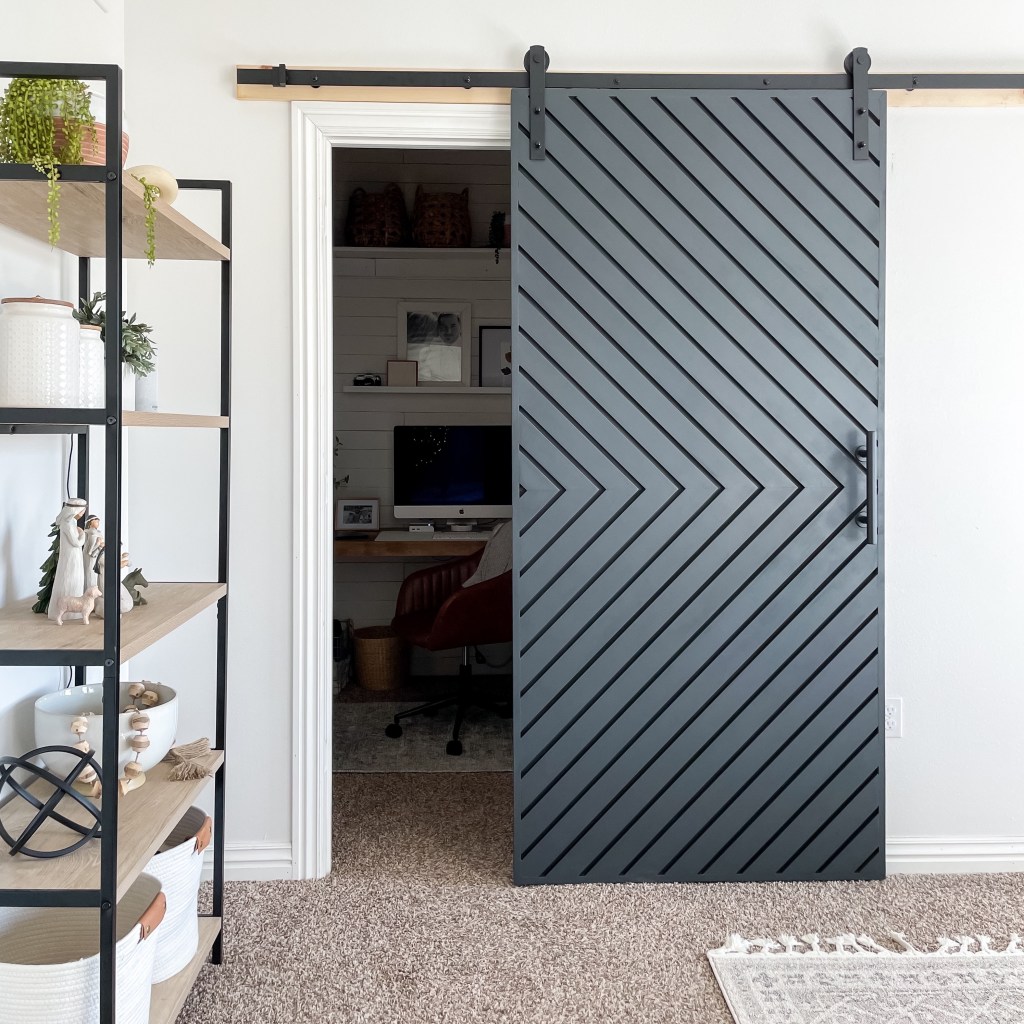
First things first. I have to give credit to Angela Rose Home for the inspiration for this build. I saw her door a couple of years ago and knew I needed one somewhere in my home.
Her tutorial is linked hereif you want to check it out.
Moving on. Like I said, I first saw this door on instagram and completely fell in love. It took me about a day to complete (including several trips to the hardware store) and cost around $250 in materials – hardware included! If you’ve ever priced barn door kits you know this is a steal!
Before you head to the store figure out how big you need your door to be. Remember a barn door extends outside of the door frame so these are usually a bit bigger than a traditional door.
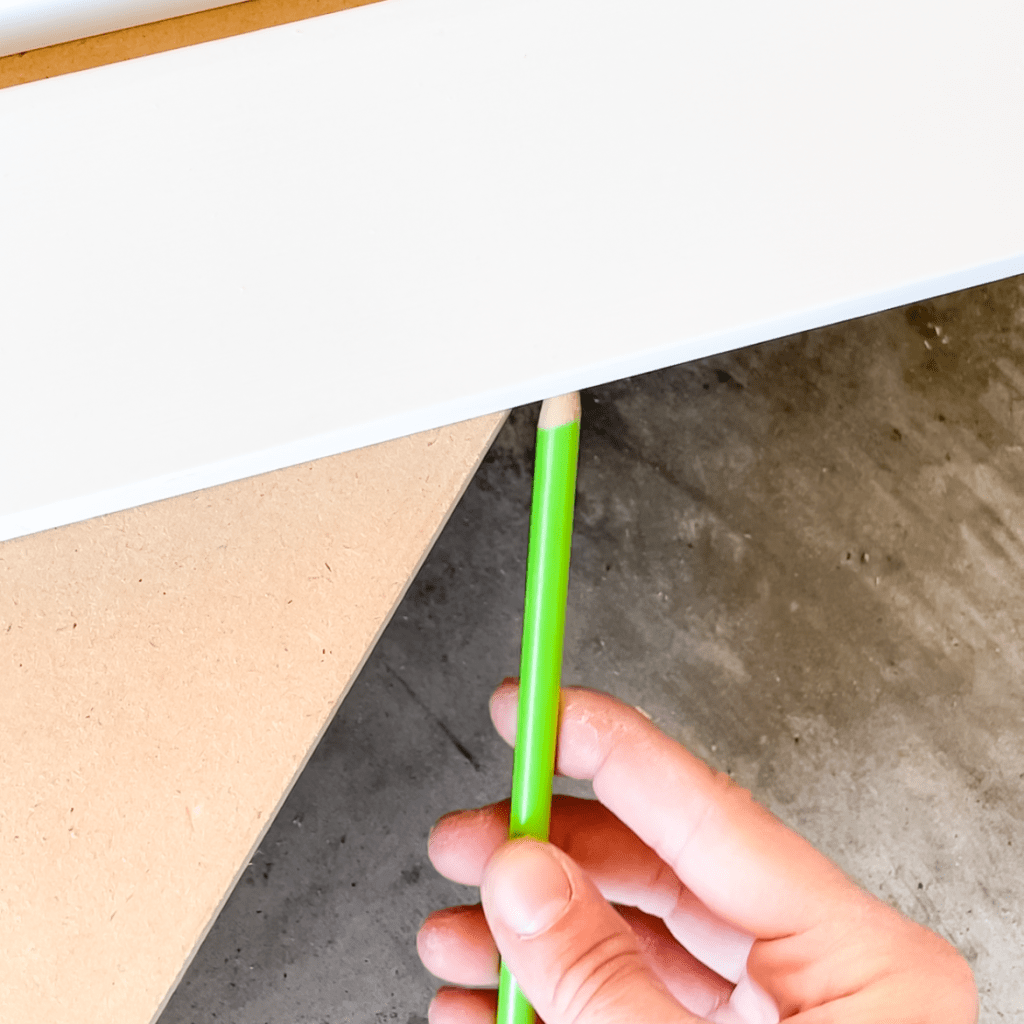
As mentioned previously my door is 84” x 40”. I used a sheet of 3/4” MDF as my base layer and had Home Depot cut it to size for me in the store. If you plan on adding trim around the edges like I did be sure to subtract 1.5” from the finished height and width you’re wanting to accommodate the 1×2 trim boards.
Also note that lumber dimensions do not indicate actual size! For example: a 1×2 board is actually 3/4″ x 1.5″.
Once you have your MDF cut down, it’s time to start laying out your design. You can get creative here, but I wanted a symmetrical look so the first thing I did was measure and draw a line halfway down the board. I used this center line as my starting point.
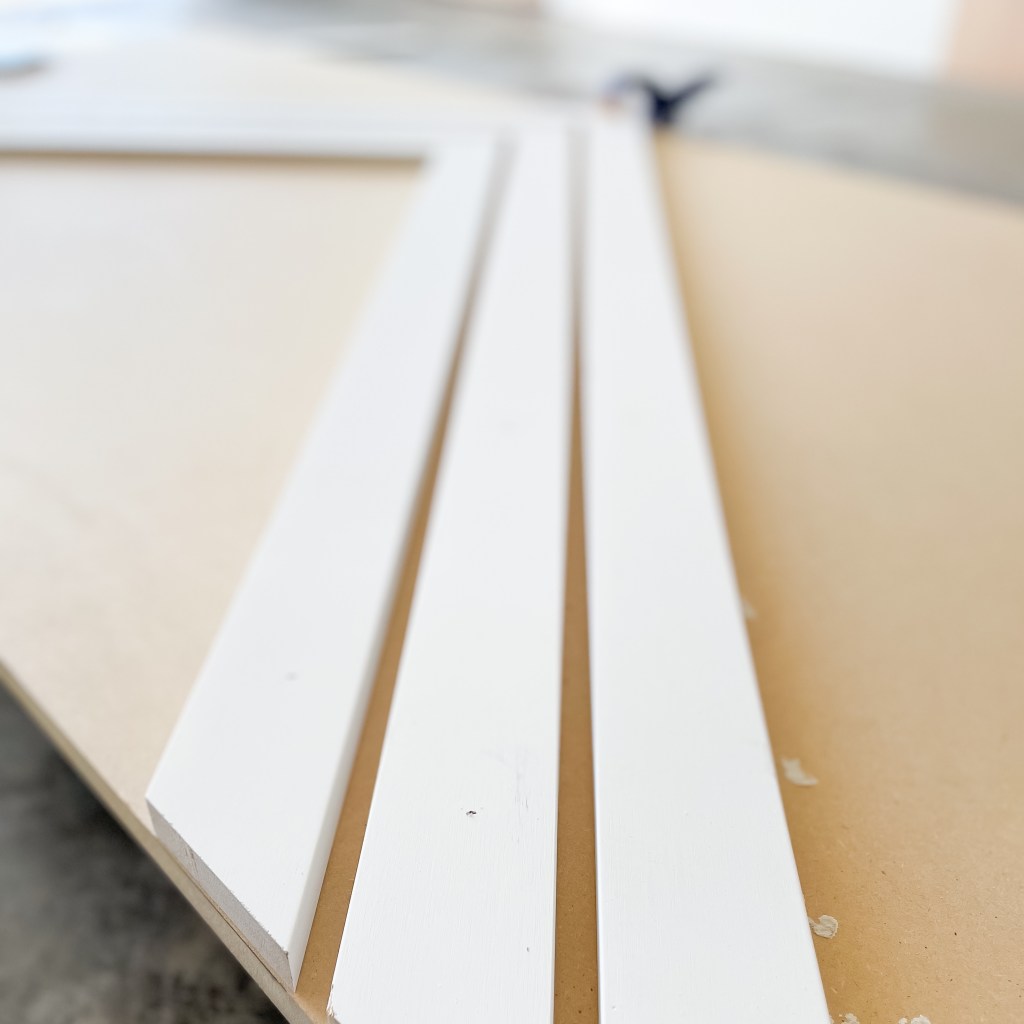
Next I took 2 of the primed finger joint boards and cut one end of each at a 45 degree angle. Using my center line as a starting point I set them in place and marked on the opposite edge where I needed to cut – no measuring required! Once you have your first boards cut to size, add a little bit of construction adhesive and top it off with several brad nails to hold them in place.
From here I just did the same thing over and over using 1/2” pieces of scrap wood as spacers for my design. Since I kept it simple and only used 45 degree angles this entire process went very quickly.
You may end up with a weird situation in the corner like I did. For this corner piece I had to make 2 cuts. One with the mitre saw angled to the left and one angled to the right. Piece of cake.
Now to trim out the entire door (if you choose to do so). For the trim I used 1×2 boards and beveled the ends (meaning I cut them at a 45 degree angle) to give the corners a nice tight fit. I attached these the same way I attached the finger joint boards. A little adhesive + brad nails. Also one thing to note – the design you just laid out isn’t going to be perfect. Some boards may hang over the edge of your MDF a little. Just sand around the edges so that your trim boards will lay flush.
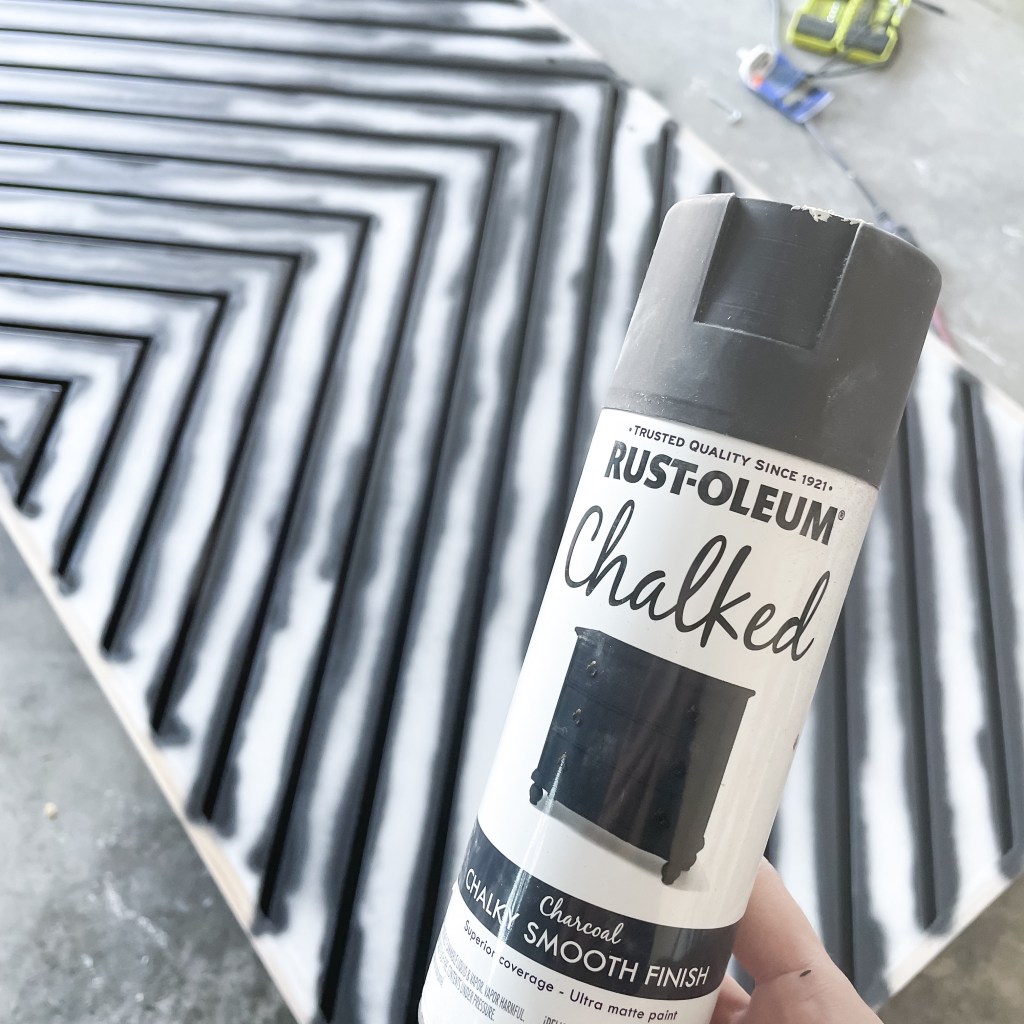
Now that your door is built, it’s time for the finishing touches. You may have noticed after you attached your trim that there are gaps between the finger joints and the trim. DO NOT PANIC. A little bit of paintable caulk or wood filler and your door will have a seamless, super clean look. Fill the gaps and wipe off the excess. Once it’s dry give the entire door a good sanding. I used 120 grit.
Once you’ve sanded its time for paint. This is where a paint sprayer would come in handy! I chose to paint my door Satin Black by Behr. I used Charcoal Chalk Spray Paint to get into all the hard to reach placed first (it’s essentially the same color), then used a smooth roller to coat the rest of the door. If you don’t have a paint sprayer I highly recommend either cutting in with a brush as you lay your design down OR do what I did and use a paint that’s color matched to a spray paint of some kind. That way you don’t have to struggle getting paint in all the nooks and crannies.
Once your door is dry you can add your hardware and install your door track. I found mine on Amazon and it came with clear instructions on how to hang everything. This door is HEAVY so make sure your track is rated to support 150+ pounds just to be on the safe side.
I could not be happier with how this door turned out. It was super easy and made a huge impact on the look of our bedroom. If you try this don’t forget to tag me!
Paint colors: Walls – Cameo White – Behr, Door – Satin Black – Behr, Accent Wall – Eucalyptus Wreath – Behr
This page may contain affiliate links, which means I will receive compensation if you click through and make a purchase.
I’d like to start off by saying: never in my life have I had SO many splinters. Totally worth it though.
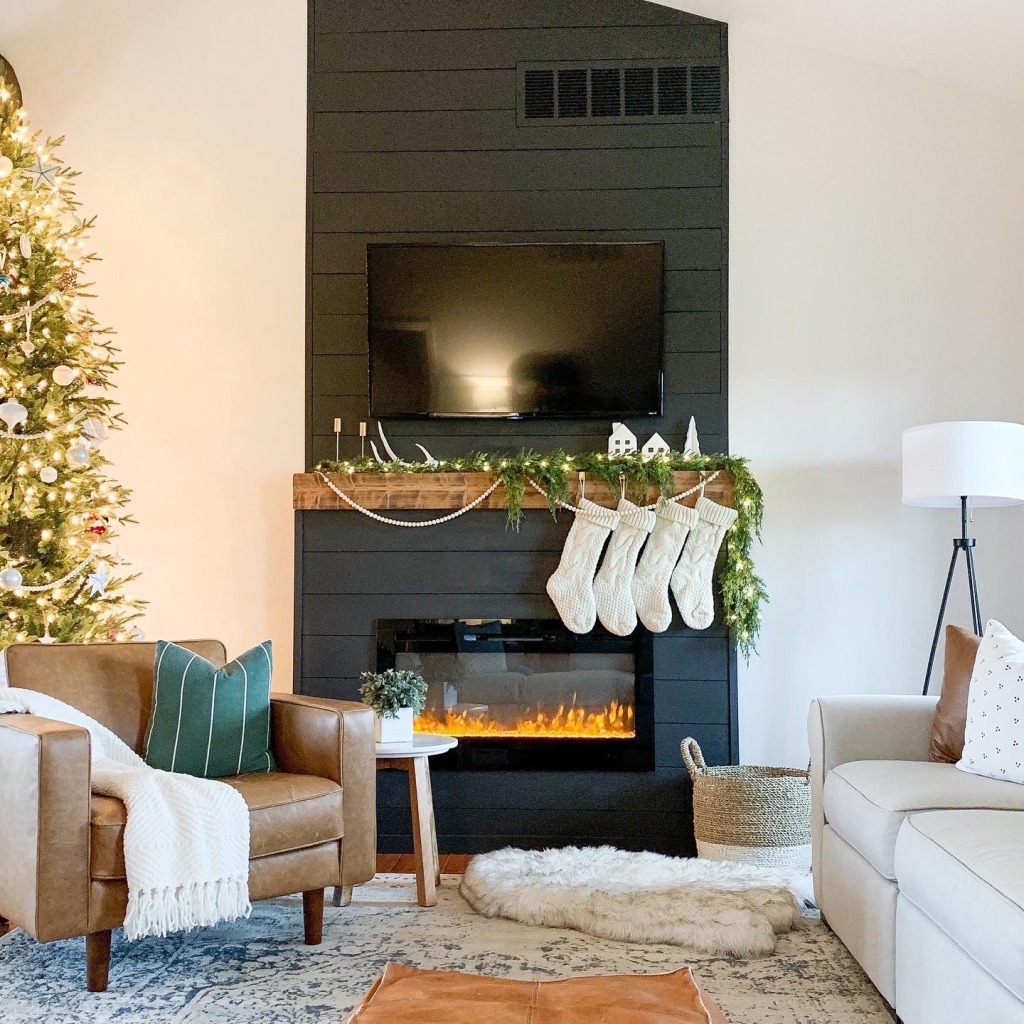
A fireplace was on our wishlist when we started shopping for our second home (our first didn’t have one either) but after 5 years of searching, this home was the closest we could get to meeting MOST of our wants within our budget – fireplace or not. After about a year of staring down our huge, blank tv wall I decided it was time to get to work.
The before – listing photo
I was intimidated at the thought of building something this substantial – but honestly, as long as you can measure and cut – you can build anything…the right tools help as well!
• Protractor (for the cuts along the vaulted ceiling)
Not all of these are totally necessary, but they will make the project a whole lot easier. If you don’t have these you could always look into borrowing or renting from your local hardware store. Many hardware stores will rip plywood to size for you as well!
I’m not going to get specific with measurements because every space will be different – this is just an overview of the process.
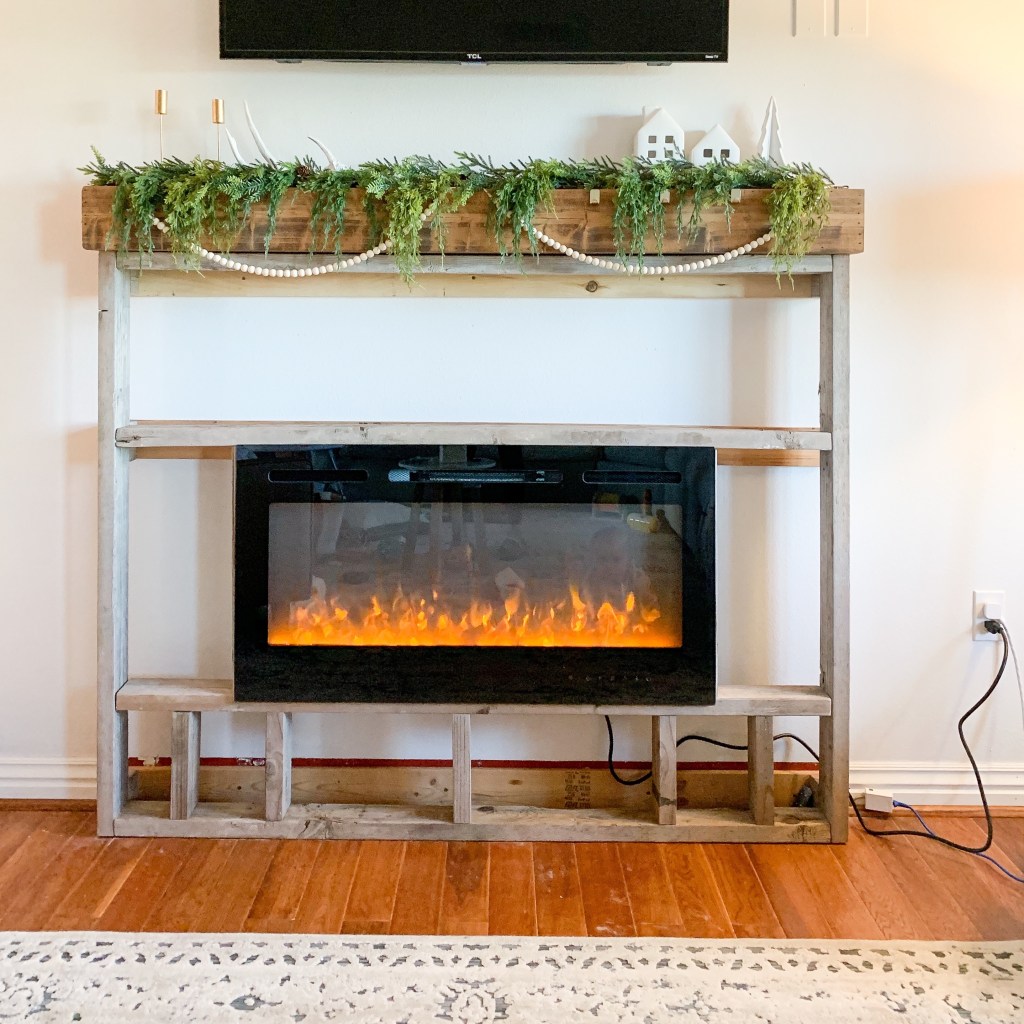
We started off with the mantle which is actually a floating shelf that we purchased from All Modern. The exact one is linked here. You could easily build something like this with a few 1×6 boards.
Once the mantle was hung I attached 3 1x4s to the wall and made sure to hit my studs. The frame that will support the fireplace insert will be attached to these 1x4s.
Now it was time to figure out my measurements. I won’t get into specifics here because as previously stated it will all depend on your preferences/needs/space. I knew I wanted a shiplap mantle – and to keep the cost down I chose to do a faux shiplap (I’ll explain what that means later). Our fireplace essentially has 4 layers to take into consideration: the frame, a plywood backer, the faux shiplap & trim. When calculating your measurements be sure to take into consideration that lumber sizes often don’t indicate the actual dimensions of your boards. For example a 2×4 is NOT 2″ x 4″ – it’s actually 1.5″ x 3.5″.
Here’s the mockup I used to help me plan out all of my cuts. Having a visual reference really helped.
First up I built the frame out of 2x4s and wood screws. The owners manual for the fireplace insert should provide dimensions of the opening you’ll need for installation purposes. Additionally, I made sure to include extra boards on the bottom to help support the weight of the insert.
Once the frame was build I attached it to the wall using metal L brackets. This was a little tricky because of the tight spacing. If I were to do this again, I would have attached the back portion of the frame first, and attached the front portion after it was secured to the wall.
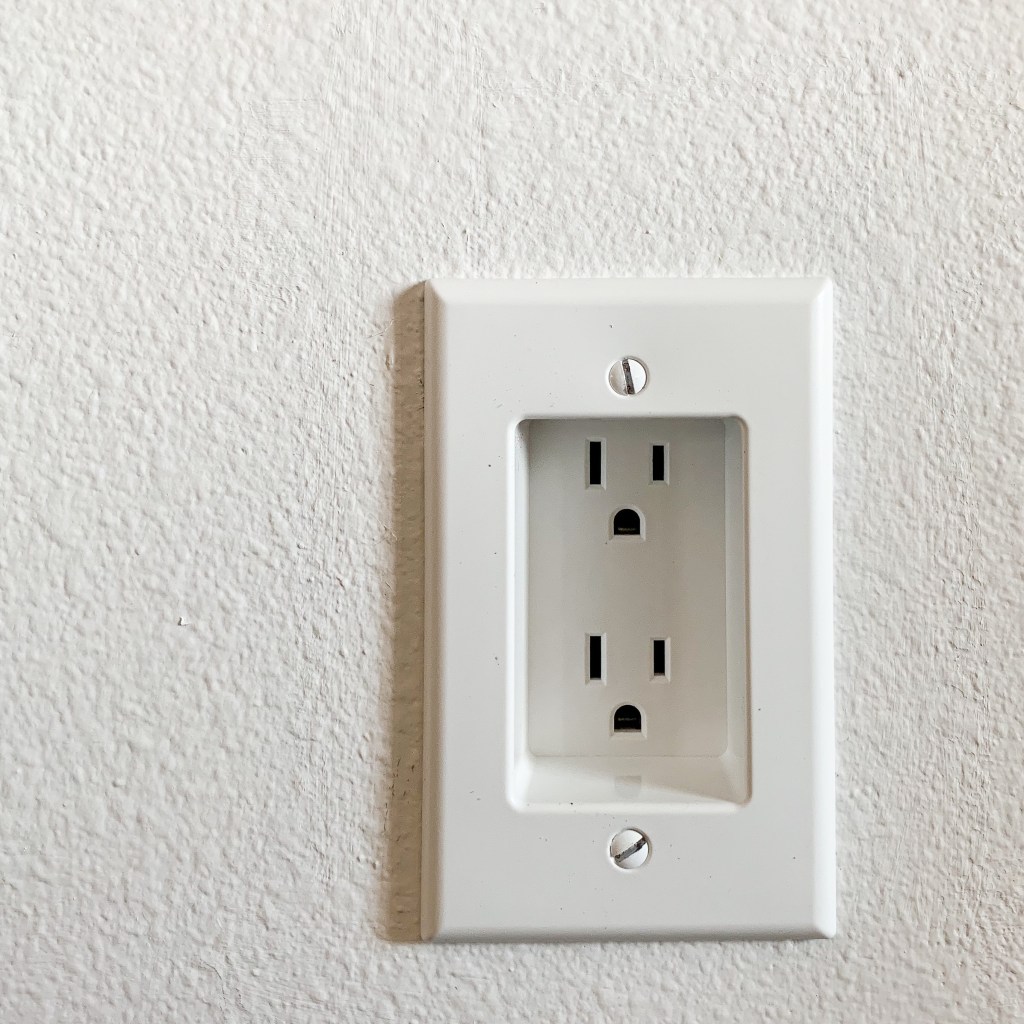
Once the frame was attached we tested the insert to make sure it fit. It did! However – there wasn’t enough clearance behind the insert for the power cord. We considered moving the outlet, but then found this recessed outlet at Home Depot. A quick switch and this solved our problem.
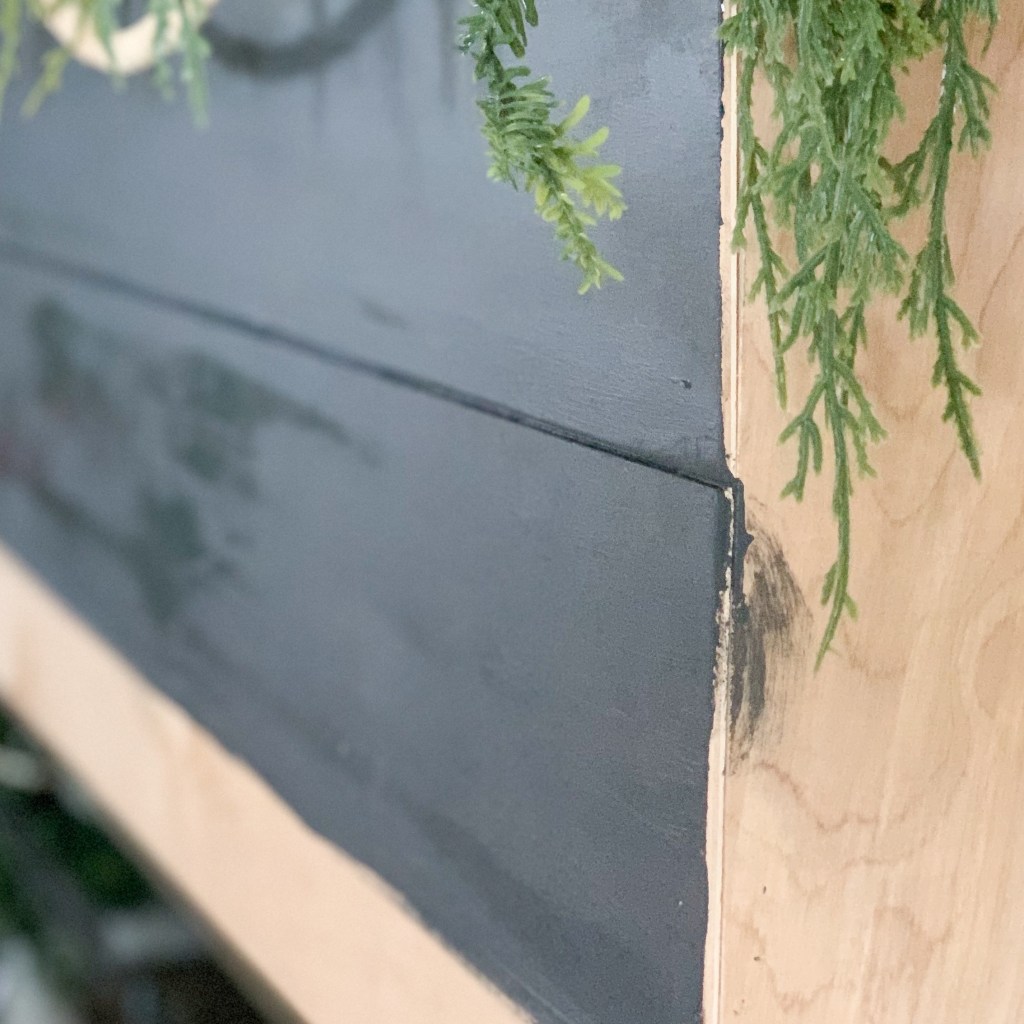
Next I applied a layer of 1/4″ plywood to the entire frame as a backer for my faux shiplap. Traditional shiplap are tongue in groove boards and only give the illusion of a gap when boards are placed next to each other. Because I’m not using a traditional shiplap, the backer board was necessary. Faux shiplap is generally plywood or MDF ripped into strips. We chose a 6″ wide board for our space.
Applying the shiplap was easy. Start at the top and work your way down placing nickels as spacers between each board. I used an 18 gauge brad nailer to attach them to the wall. It’s best to alternate the angle of your nails as you go to get the strongest hold. Trust me when I say: ALWAYS cut in with your stain or paint between attaching each board. This will save you a lot of time and frustration in the long run. If you forget, no worries! Grab a small paintbrush from the craft section and get to work.
Once your shiplap is applied and painted, you can give it a finished look with some trim! I used a little bit of lattice trim for the edges and a nice 1×3 around the base. I painted these boards prior to attaching them so I wouldn’t have to worry about taping.
You could stop here! We chose to run our shiplap all the way to the ceiling 1. because we liked the way it looked and 2. because we have an intake vent that we wanted to hide! It worked perfectly. I used more lattice trim to give it a finished look.
Overall I am SO happy with how this project came together. Our living room finally has that cozy feeling and it transformed a huge blank wall into the focal point of our great room.
A few takeaways I have from this project are:
• Black Paint somehow gets EVERYWHERE.
• Make sure you have the correct saw blade when cutting plywood. Otherwise it splinters!
• Always cut in with paint or stain between your faux shiplap.
• Measure TWICE. In some instances 3 times!
Most importantly, be creative! Make this process your own and don’t feel like you have to make your space look EXACTLY like someone else’s. The best part of DIY is getting to make your home EXACTLY the way you want it. If you give this project a try, be sure to tag us so we can see!
Paint colors: Walls – Cameo White – Behr, Fireplace: Satin Black – Behr
I wanted to share a few of the Valentine’s that I have created for my boys over the years.
Some of these work perfectly on their own and you don’t have to pair them with anything but I like to include a little treat for the kids – plus my boys always love to help put them together! My favorite treat bags & supplies are all linkedhere. I recommend printing these on some sort of card stock!
These hot wheels Valentine’s are the cutest! Use a hole punch on the gray circles, hot glue a hot wheels car in the middle and add some fun twine.
For the Lego obsessed kids – I paired these tags with some super cool “lego” packs that I found on Amazon! There were lots of options: rescue vehicles, sea creatures, dinosaurs and safari animals to name a few. Just pop the tab off and tie the new tag on with some twine.
I paired these “You Color My World” tags with heart shaped crayons. See tutorial here. These would also be cute with some Skittles or other colored candy!
This page may contain affiliate links, which means I will receive compensation if you click through and make a purchase.
The most wonderful time of the year is upon us. The next few months will be spent eating entirely too much and making memories with family & friends…and then there are the gifts. If there’s one thing I’ve learned while being a mom it’s that people LOVE buying for children. With the gifts comes the dilemma of where to put everything. This is why a few times every year (usually before Birthdays & Christmas) I make it a point to go through the house to make space for what’s to come. I have a few tips for maximizing your space and keeping those cluttered rooms organized.
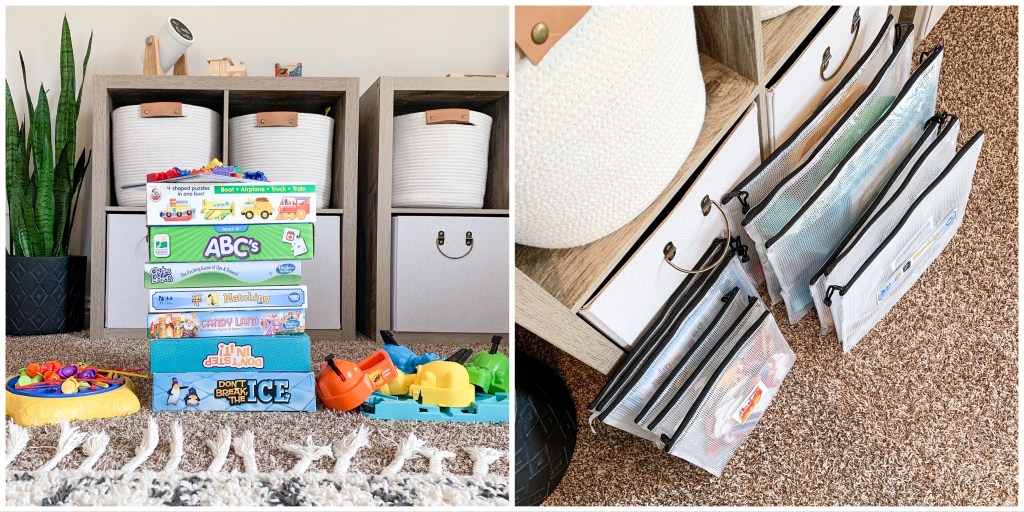
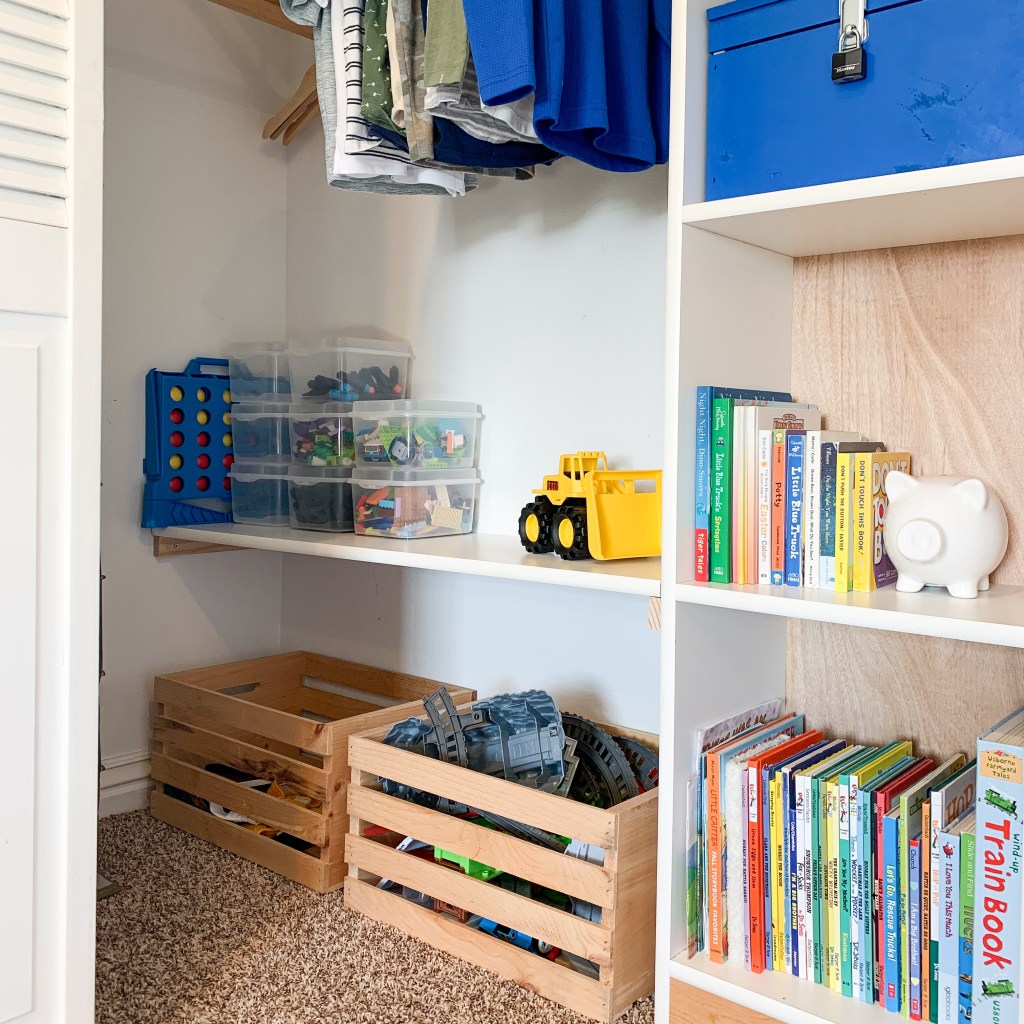
This year, the first thing I tackled was the stack of board games and puzzles that was taking up a good portion of our 4 year olds closet. The boxes were super bulky, and were starting to look pretty worn down. I found some zippered pouches on Amazon and they were the perfect solution.
These bags came in several different sizes so I was able to fit every game perfectly. I also took the time to snip the name from the side of each box, and tape it to the front of the bags so we can easily tell what’s inside. I was able to fit 8 board games and 4 puzzles into one 21 x 15 inch drawer. This seriously freed up a ton of space and even better – no more torn up boxes!
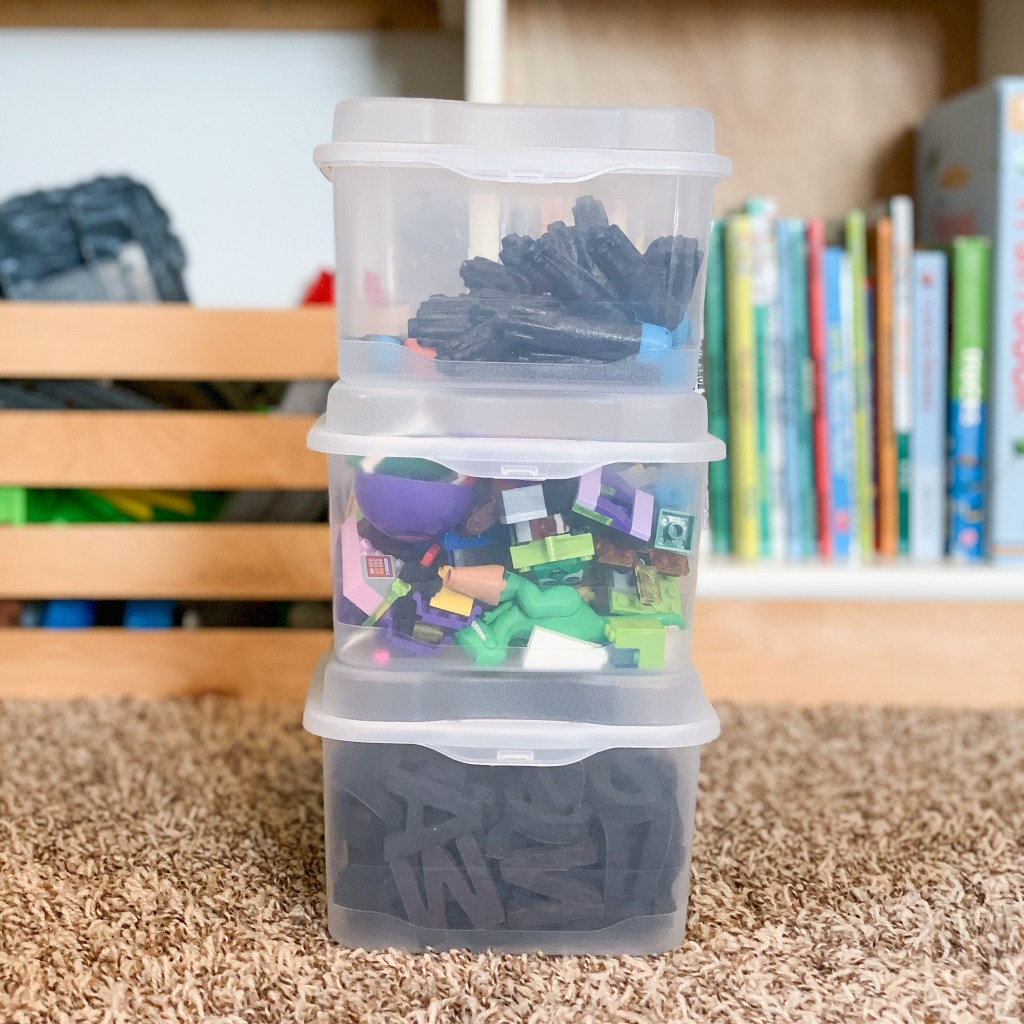
Next up I wanted to find better homes for his smaller items (like Legos, marbles, etc). These clear flip-top boxesI found at Home Depot are the best! They’re cheap ($2 each), stackable and the fact that they’re clear allows your kids to see what’s inside so they can easily find what they’re looking for.
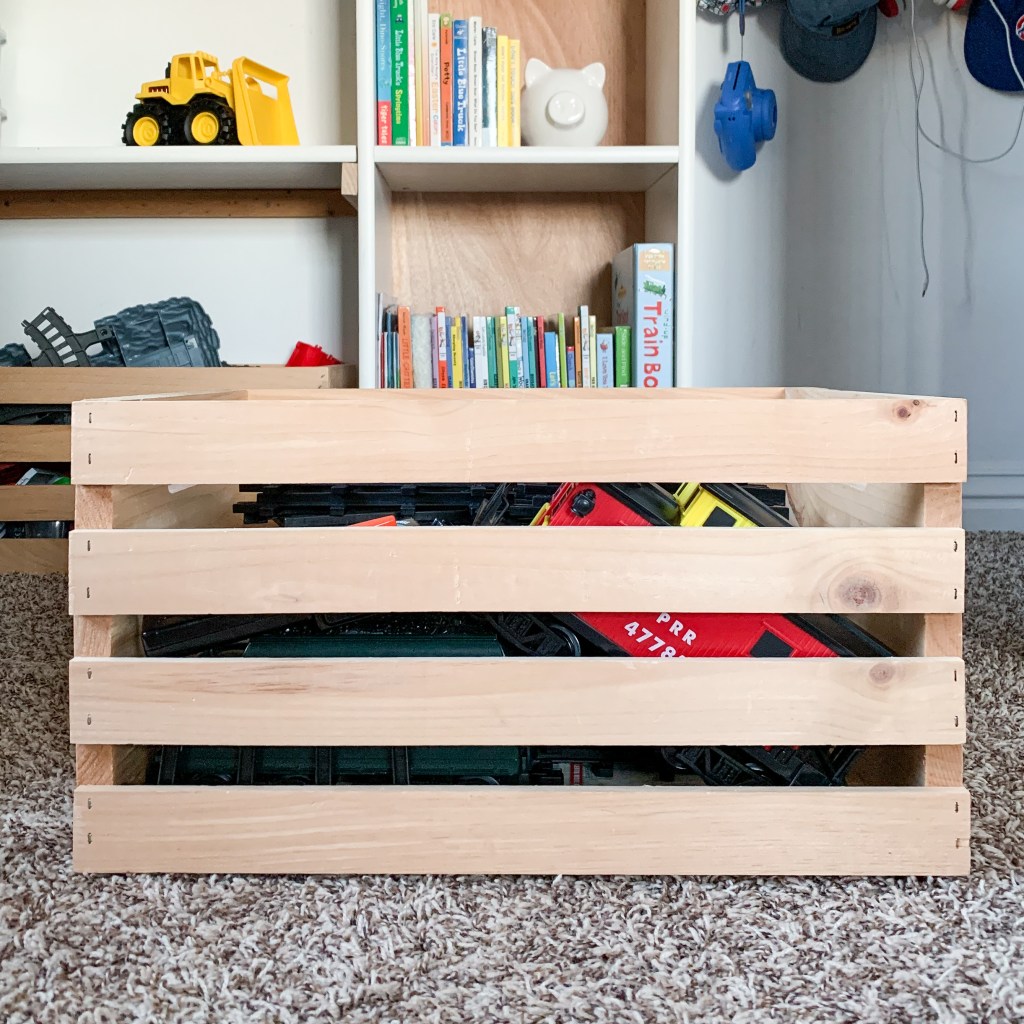
For larger items that don’t fit into cube storage, I like to use these wooden crates. They’re super affordable and bring a little bit of texture to the closet space. You could also stain or paint them, but I prefer the natural wood. We bought ours at Walmart several years back, but you can find them pretty much anywhere for around $10 each.
Now that I had everything sorted into bins & containers, it was time to find a home for all of it. Adding a shelf inside the closet made a huge difference and gave me quite a bit more storage (with some to spare). It’s amazing how much more functional adding a shelf or two will make a space.
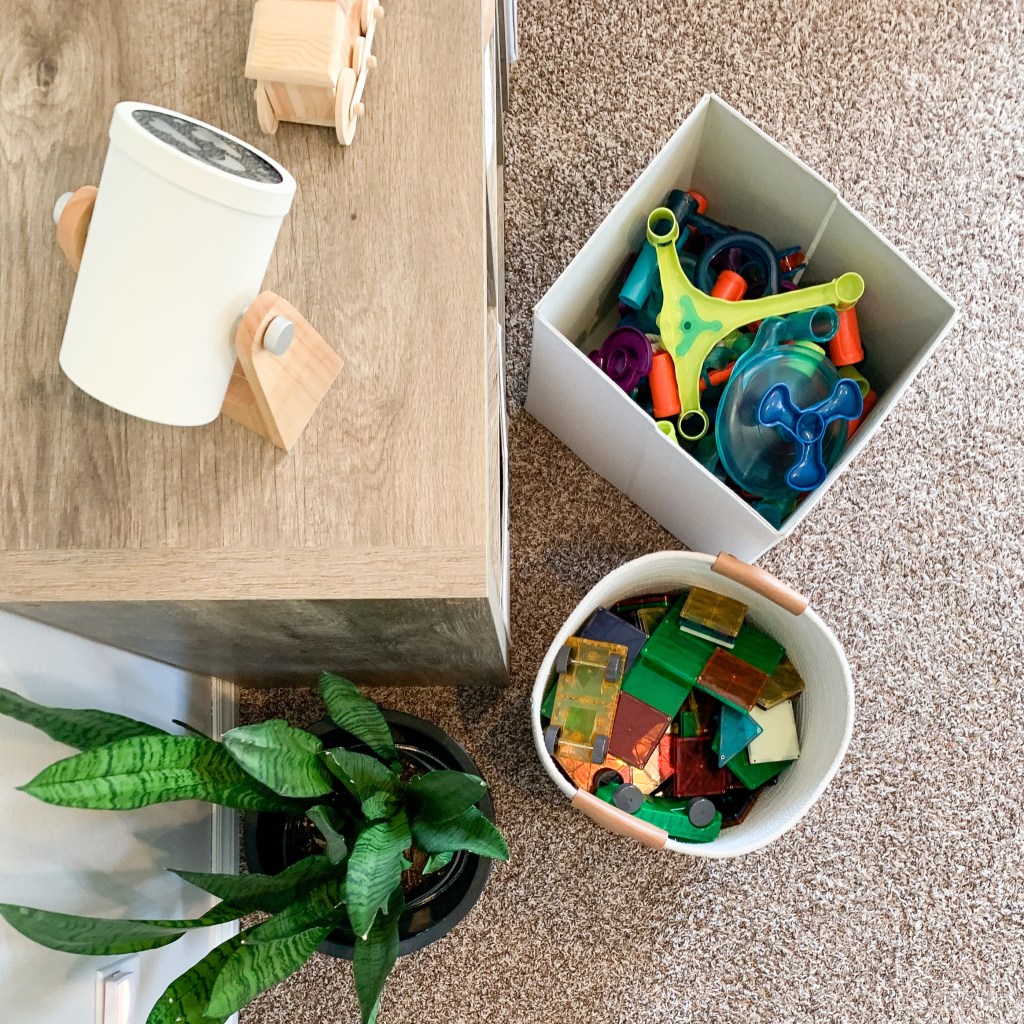
Our nursery hasn’t had much in it other than clothes and diapers, but now that our baby is getting bigger, I’ve been pulling more toys out of the attic. We added these $30 cube shelves to the closet and it gave us a great place to store everything neatly. Down the road we’d love to have nice, built-in closet systems installed, but these work perfectly for the time being.
We hope you found some of this helpful as you prepare for the upcoming holiday season. We know all too well that this time of year can be just as stressful and hectic as it is joyous. Don’t let yourself get overwhelmed. Here are a few additional tips to help keep your rooms clutter free.
Things to Remember
Store, Sell, Donate or Trash
A few times a year, inventory the items in your home to figure out what can be put into storage and what could be sold, donated or thrown out.
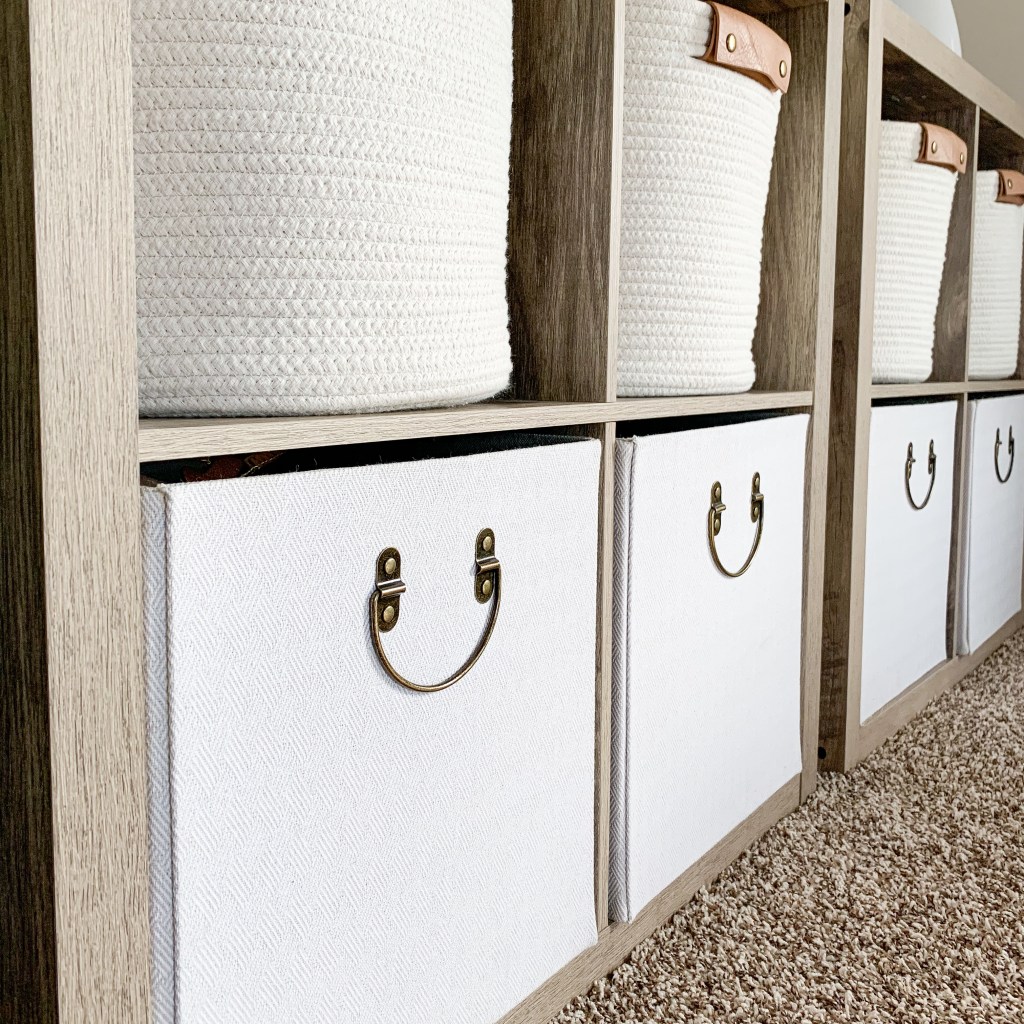
Baskets + Bins are Everything
Decorative bins are super functional, but also look good and can add texture to any room.
Dressers are Not Just for Clothes
Get a huge dresser. The dresser in our nursery not only holds clothes, but also functions as a changing table, diaper storage and extra linen storage among other things.
Utilize Empty Space
Look at every empty space is potential storage. We built this train board that fits under our son’s bed. We love it because it doesn’t take up any floor space in his room when he’s not using it.
This page may contain affiliate links, which means I will receive compensation if you click through and make a purchase.
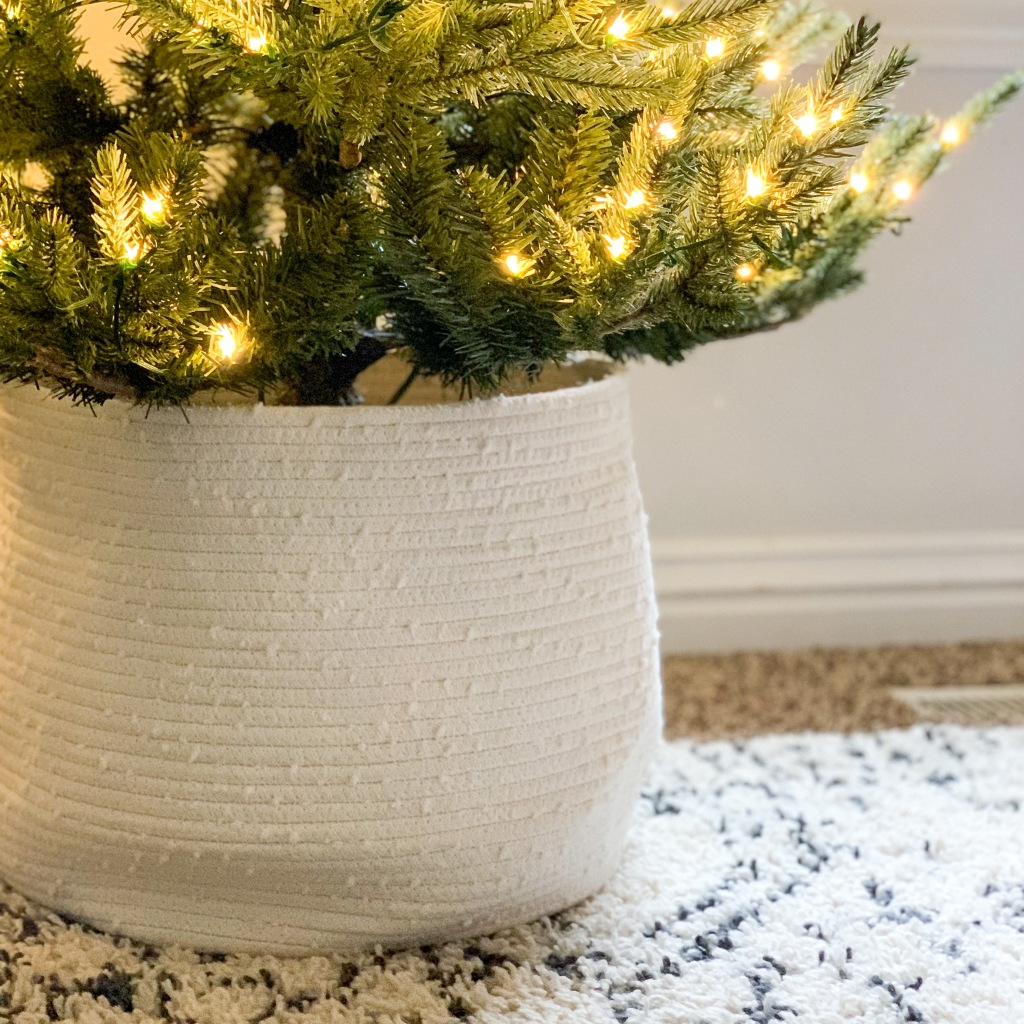
I fully planned on hopping on the “tree in a basket” trend this Christmas – so CUTE! That is until I realized that my tree stands were WAY too big for most of the baskets in our home. I quickly went to Google to try and figure out how to make it work.
You know what I found? Nothing. Well not exactly nothing. I discovered that many people are just stuffing blankets in the basket and hoping their tree stays upright. This gave me all the anxiety so I decided to modify instructions for a couple of full sized tree stands to fit my needs. Both options were super easy and relatively cheap.
Option 1: Wooden Tree Stand
Supplies Needed:
2 x 4 Board (Length will depend on the dimensions of your stand)
Drill + Screw gun
Tape Measure
12 x 2″ Wood screws
4 x 1-3/4″ Wood screws
1-1/4″ PVC Pipe (Length will depend on the dimensions of your basket)
Level
The first option is a very simple stand made from 2×4’s. I found the original plans on YouTube via Handyverse, and modified the dimensions to fit inside of a basket with a 14″ diameter plus added a 1-1/4″ piece of PVC in the center to accommodate the “trunk” of an artificial tree.
This stand was actually the cheapest of the 2 because we already had some scrap wood and screws in our shop. The only thing we had to buy was the PVC pipe.
The stand consists of 2 tiers (shown above). As you can see I configured the second tier of this stand to fit snuggly around the PVC. (If you have plans to place a live tree in this stand, you’ll want to leave extra space).
Once each tier was constructed, I attached the top to the base with 3″ deck screws set at an angle. (We don’t have one of those fancy pocket hole devices). Be sure to drill pilot holes so you don’t split your boards. Finally, I used 1-3/4″ screws to hold the PVC in place (make sure it’s level first).
She’s not the prettiest girl at the ball, but it fits perfectly inside the basket…no one will ever know it’s there. As far as sturdiness goes – because we had to make this one so small, I wouldn’t trust it to hold a large tree but it will be perfect for the 5’ tree we are putting in our oldest son’s room.
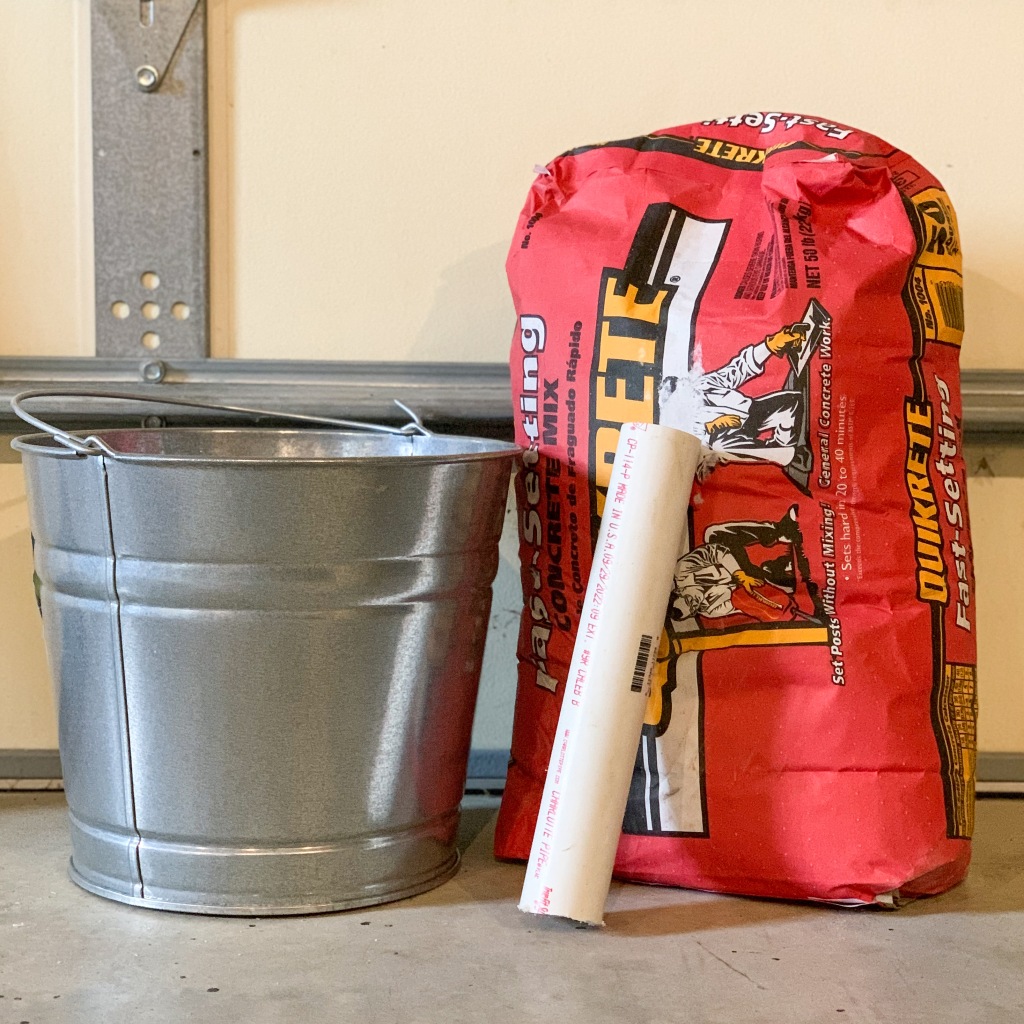
Option 2: Bucket Tree Stand
Supplies needed:
A Bucket that fits inside of your basket (Planters would work too)
1 Bag of Fast-Setting Quikrete
1-1/4″ PVC Pipe (Length will depend on the dimensions of your basket)
Level
Water
This one was my favorite of the 2 because it was SO EASY. This option was inspired by Ella Claire & Co‘s DIY Concrete Christmas tree stand – just on a smaller scale. For this I picked up a 10 quart bucket and a bag of Fast Setting Quikrete. I also used the other half of the 1-1/4″ PVC pipe used in the wooden stand.
Place the PVC pipe in the center of the bucket, then have a helper pour the Quikrete into the bucket. It doesn’t get more straightforward than that. Be sure to leave an inch or two at the top so there’s room to add water to the concrete mix.
Level your PVC pipe, then add water per the directions on the bag. Thats it! No mixing required. Once the Quikcrete sets you’re ready to go. This stand is HEAVY and should be quite sturdy – more than enough to handle the 7-1/2′ slim tree that I plan on putting in it.
There you have it. Both options are totally customizable to fit your needs. Now all of your tree-in-a-basket dreams can come true…sans wadded up blankets. If you try either of these DIY’s don’t forget to tag us!
This page may contain affiliate links, which means I will receive compensation if you click through and make a purchase.
We are getting close to baby time and we’ve really been putting some emphasis on making sure our almost 4 year old is feeling the love right now. His last few weeks as an only child are rapidly coming to an end. Just this weekend we let him plan our entire day. We hit up the trampoline park, Lowe’s and ended with lunch at Chuck E. Cheese. The 3 of us had a blast!
We have been prepping him as much as possible about what’s going to happen once baby brother is here – it’s definitely going to be a transition for everyone. So far, he is SO excited to be a big brother. I hope his enthusiasm continues once there’s an actual baby living under our roof. Several people have mentioned bringing a gift for him from baby to the hospital. I thought this was GENIUS so I wanted to share everything we found.
Links for everything are listed under each picture.
The first thing I looked for were matching shirts – because DUH. I ordered a simple, but super cute onesie and t-shirt combo from Amazon. There were TONS of different size combos and colors to choose from, which was great. I am always hesitant to order clothes from Amazon because, quite frankly, you never know what you’re going to get. I was pleasantly surprised with the quality of both of these items. The sizing seemed to be spot on as well.
Cam LOVES to read books. There are a few we’ve read so many times that he can read them to us – almost verbatim. Not bad for a 3 year old! I found this sweet little book about becoming a big brother on Amazon. There’s also a version for all the soon to be big sisters – both are linked above!
We also know that life will be a little hectic once baby is here. I have a good feeling that Cam will be getting a little extra iPad time come April while we are all adjusting – no complaints from him there! I found these cute little headphones on Amazon…so affordable as well and have great reviews. Added bonus: we won’t have to listen to his cartoons or games anymore when he’s getting in his screen time.
For Christmas this year, Camden received this really fun instant camera – he has had a blast taking his own pictures and filling up his photo album. The film is a bit pricey, so we only let him have it for special events or as a reward. This is definitely a prime photo taking sort of occasion! I can’t wait to see what all he captures.
Lastly, (but most importantly) we included a card with a special message from “little bro” in it. It’s such a bittersweet time for us right now. On one hand Camden won’t be our only baby – the center of our world anymore; on the other we cannot WAIT to meet this new little man and watch Camden grow in his new role as big brother. My husband and I both know he will rock it!
This page may contain affiliate links, which means I will receive compensation if you click through and make a purchase.
If you’re looking for a super simple yummy Valentine’s treat – look no further. I volunteered to bring snacks for my son’s Pre-K and Daycare Valentine’s Day parties, so I wanted something that was quick and easy. These Oreo pops were a breeze. These could easily be customized for any holiday or occasion. Here’s what you need:
Oreos (I chose Red Velvet)
Treat Sticks
White Chocolate
Sprinkles (Optional)
Food Coloring (Optional)
Parchment Paper
First you’ll want to prep your Oreos. Simply place the treat sticks into the filling. The double stuff or any of the flavored Oreos work the best because they have more filling to help hold the sticks in place.
Next melt your chocolate according to the directions on the package. Sorry if these directions are vague but I know from experience that each brand of chocolate is different. The kind I bought was microwaveable – so easy!
Once you have that ready, it’s time to dip your Oreo pops. Make sure the cookie is completely coated and set them aside on your parchment paper to dry. I needed to make 3 dozen of these bad boys to cover both parties. I made the first dozen white, then added a couple drops of food coloring between each dozen…that way I ended up with 3 different shades of chocolate just for a little variety.
If you choose to decorate your Oreo pops, you’ll want to do so while the chocolate is still wet so the sprinkles will stick. You can also use a fork to drizzle extra chocolate if you like that look.
Now you just have to wait for them to harden (put them in the fridge to speed up the process). That’s it! These are so simple and would be a great recipe for your kids to help with too. Added bonus – you can make these up to a week in advance if needed as long as you store them in an air tight container. Give them a try and be sure to tag us so we can see your creations!
This page may contain affiliate links, which means I will receive compensation if you click through and make a purchase.
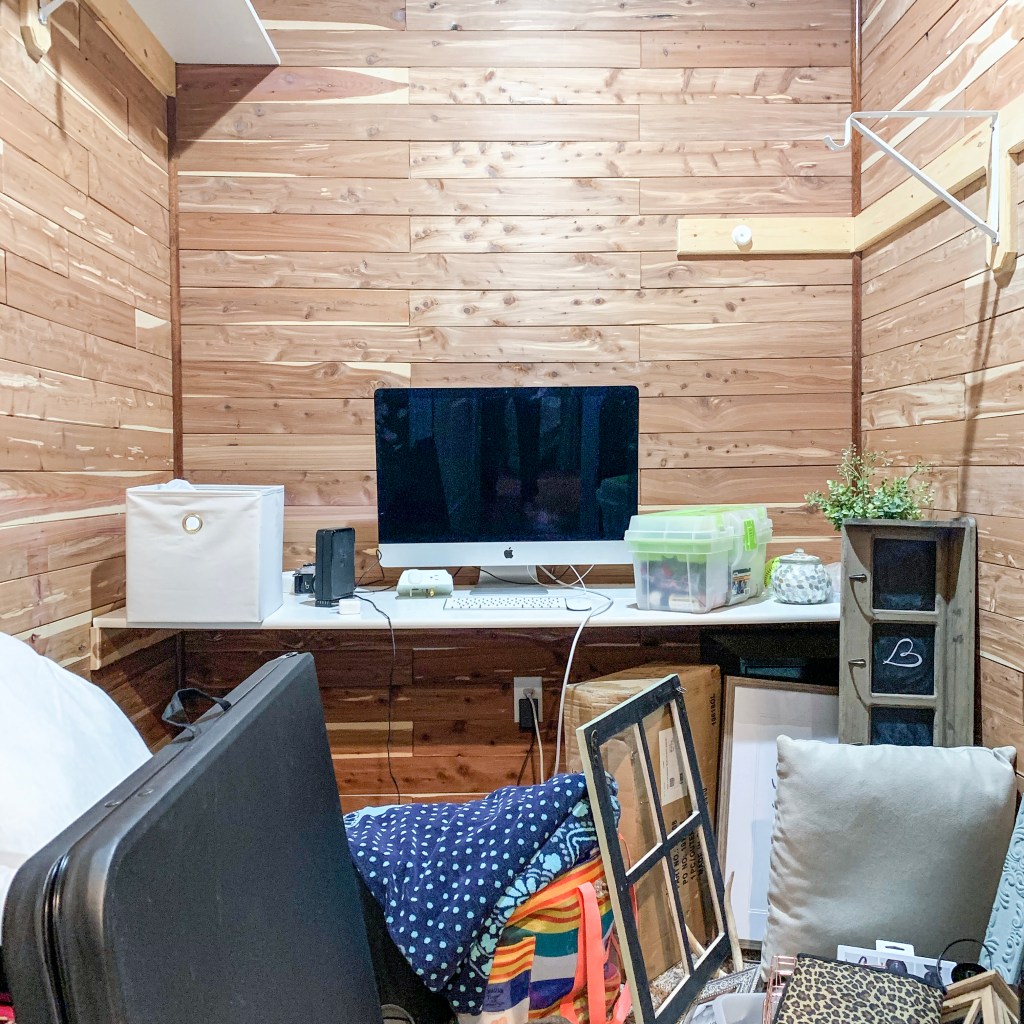
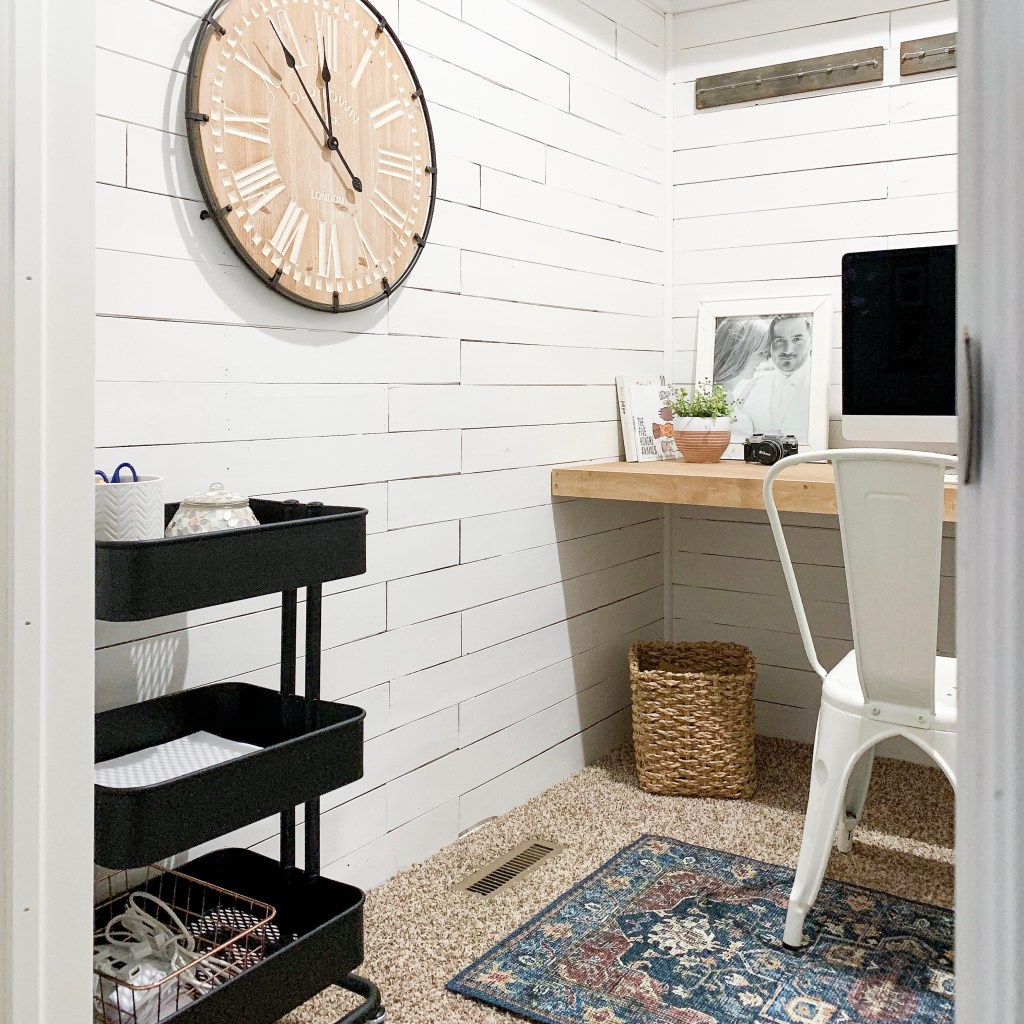
This project was so fun and SO easy! We have 2 cedar closets in our Master bedroom. One right off the bedroom and one connected to our bathroom. We didn’t really have a need for 2 huge closets, and with baby #2 due in just a few short weeks, I really wanted to make sure we had a dedicated workspace set up before his arrival – not only for when my husband is working from home, but also because I will be working from home for the 2nd half of my maternity leave.
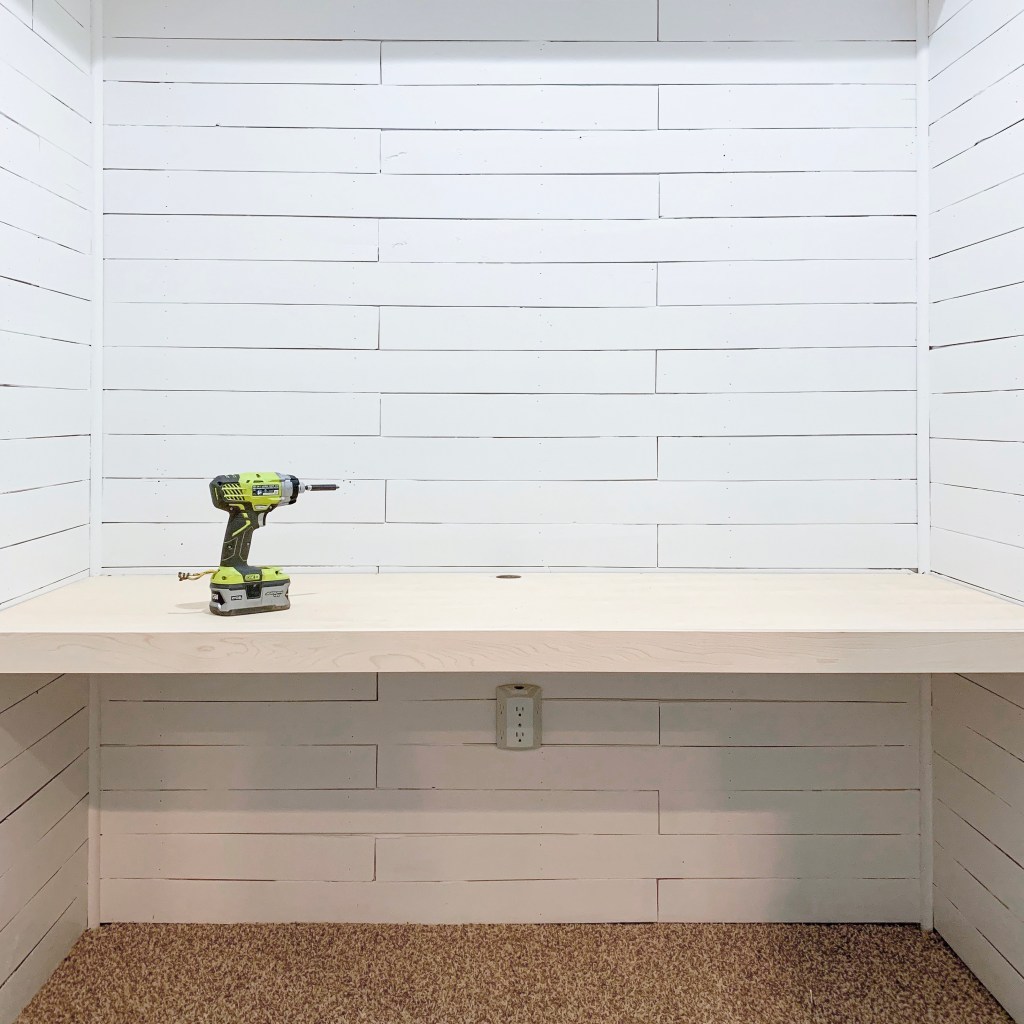
The before: This is what we started with. Just a plain cedar closet…which quickly became our go-to junk room. New house problems. Just looking at this picture gives me so much anxiety.
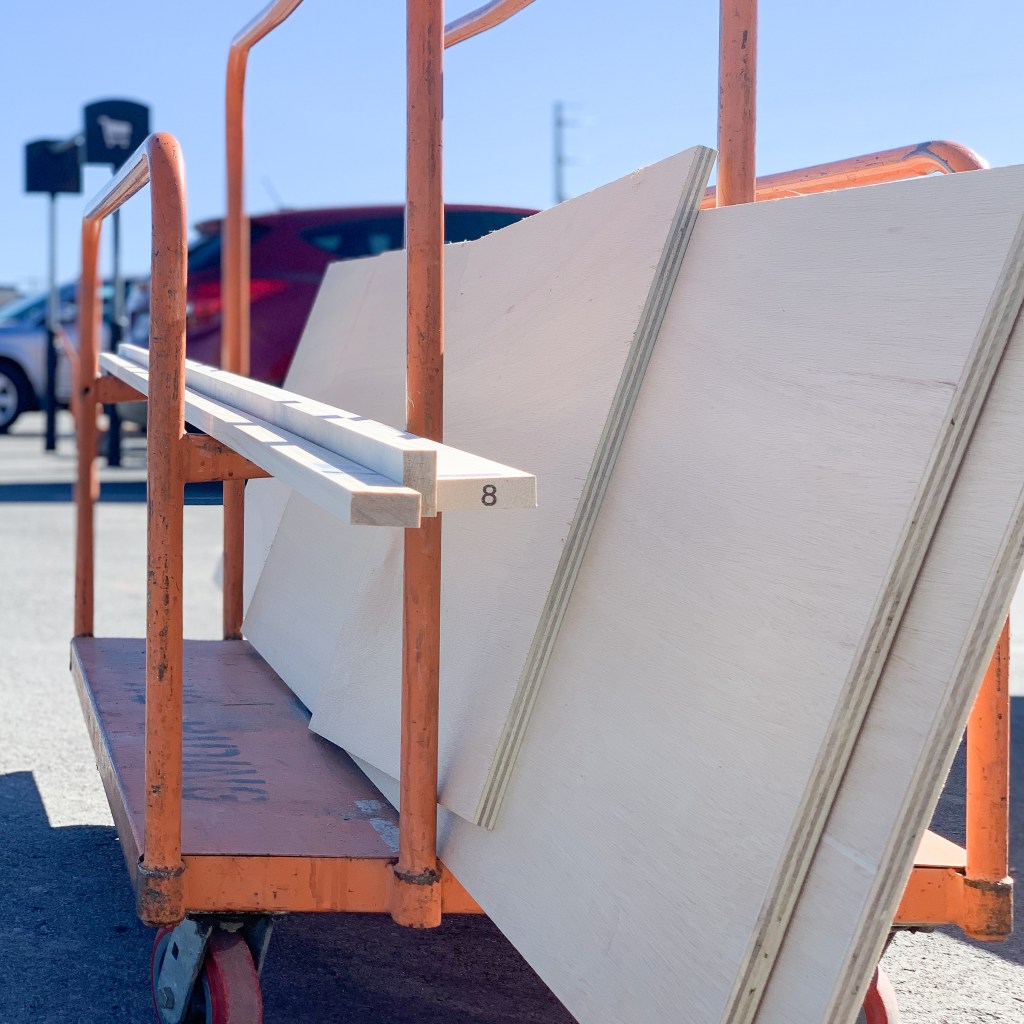
For us, every project starts with a trip to Home Depot…and usually several more after that once we realize what we’ve forgotten. Luckily not the case this time. We got everything we needed in 1 swoop! The supplies we picked up were:
Desk top: 3/4 in sheet of plywood (we chose Maple – 4 ft x 8 ft – Home Depot cut it down to our specifications)
Front Trim: 1 in x 3 in x 8 ft board (also Maple)
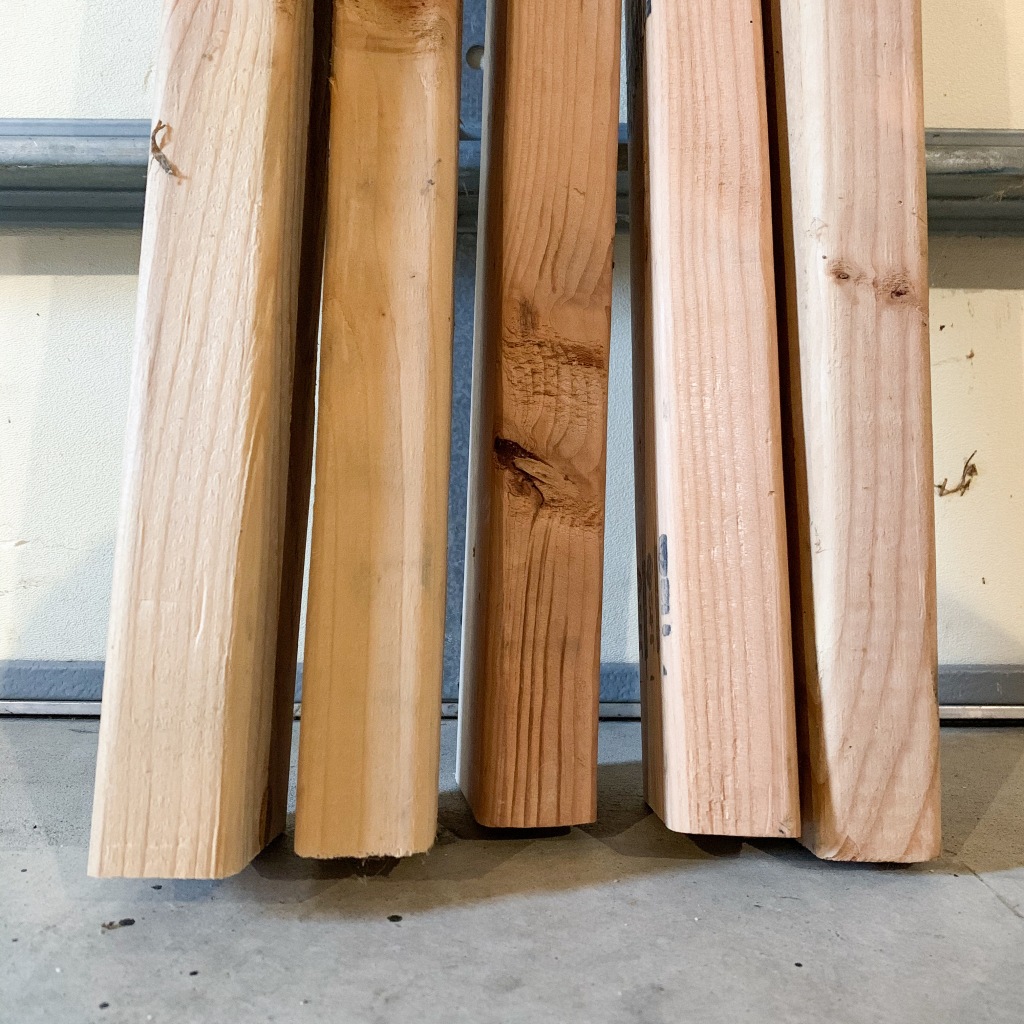
Supports: 1 in x 2 in x 8 ft common boards (which we ended up returning because we found some useable lumber in the garage)
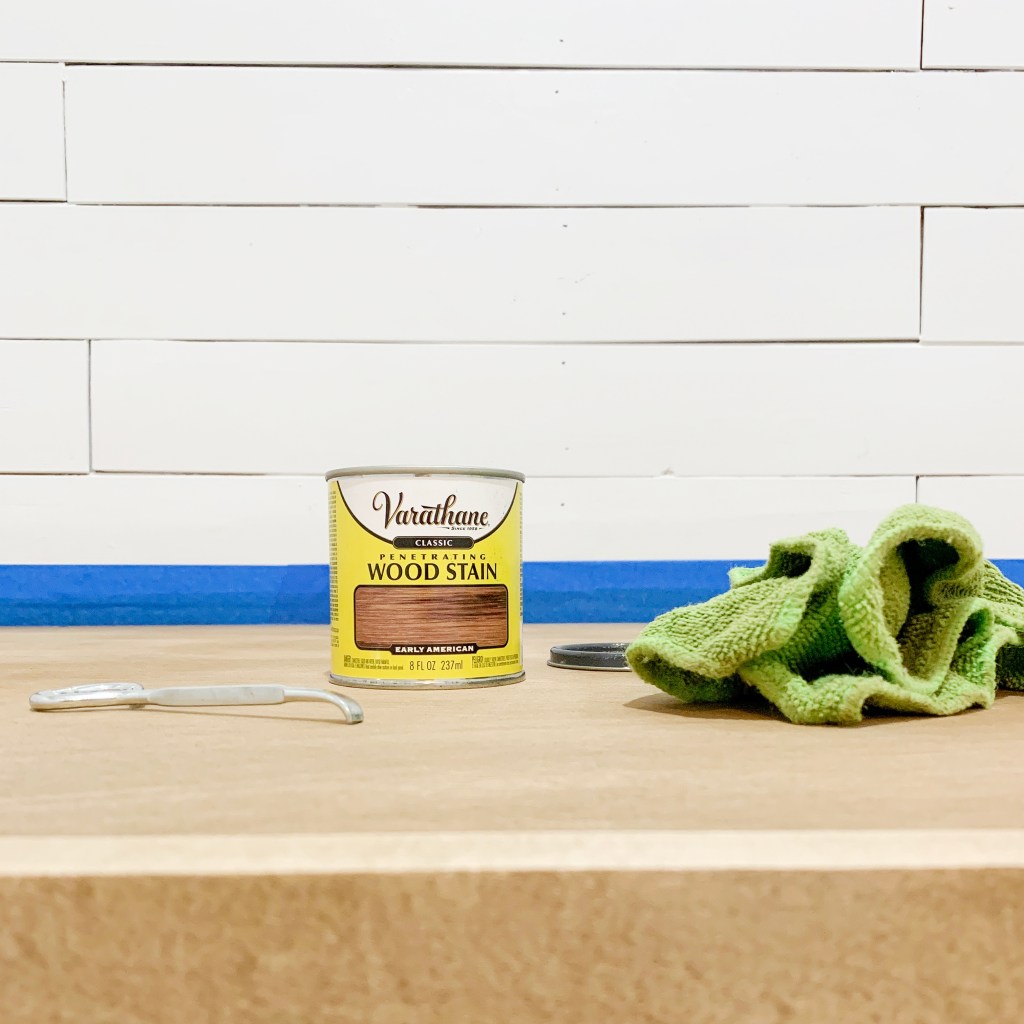
Wood Stain – Early American
Any additional supplies (like wood screws, tools, etc) we already had at home.
After we cleared everything out, our first step was to paint! My husband’s most favorite pastime. We really wanted to brighten up the space since there are no windows, so we chose Cameo White by Behr. We’ve used it in several rooms throughout the house and love it. It’s the perfect amount of white without being too white.
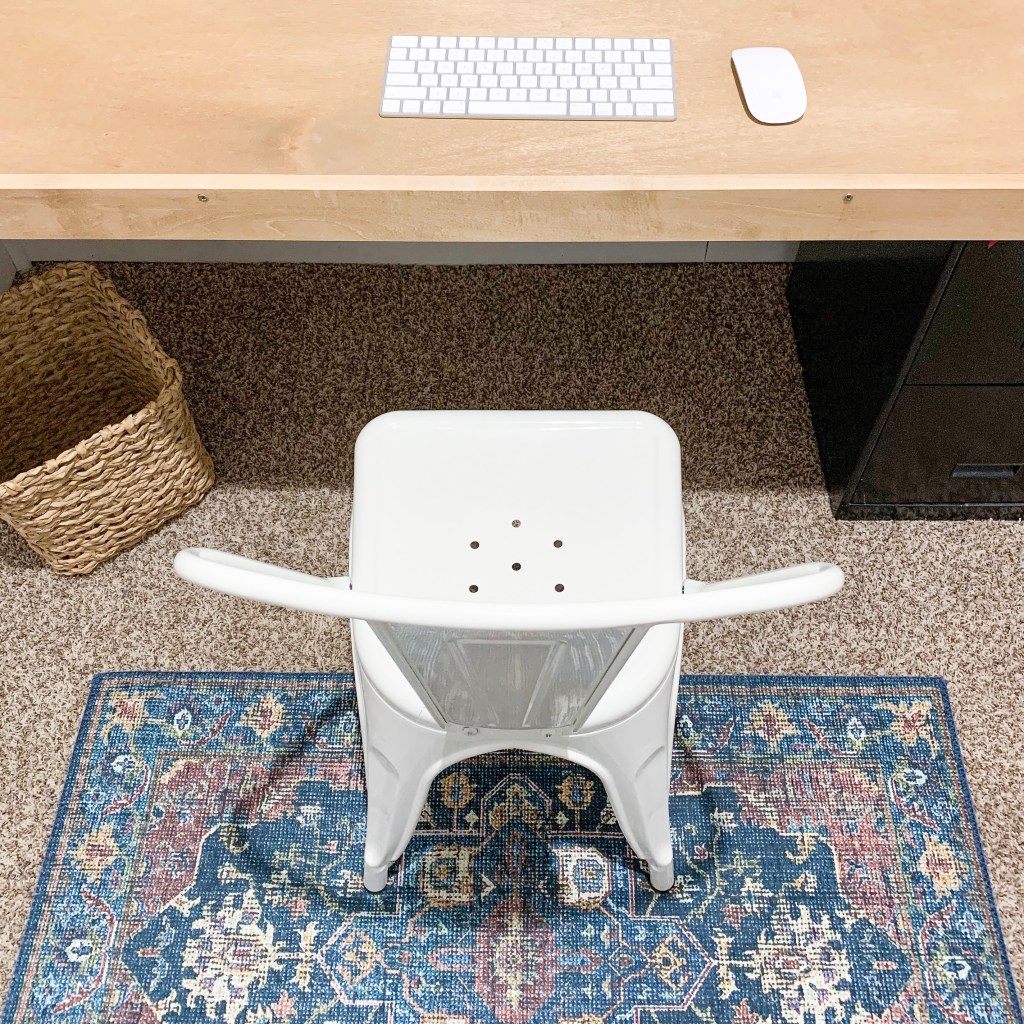
Next came the desk install and you guys…this was SO easy. We are NOT super handy people. We are the type who turn to Google or YouTube for most projects. Sometimes it works out great, other times not so much. If you can measure, cut and use a drill – you can build this desk.
First we located the studs – you’ll want to attach your 1×2 supports to those for added strength. Use a level and set your first support at the height you want the desk minus the thickness of your plywood. Be sure to drill pilot holes for your screws otherwise you might split your boards. You can see how we attached the supports in the image above. Nothing fancy. Just a few wood screws and voilà! Support boards are done.
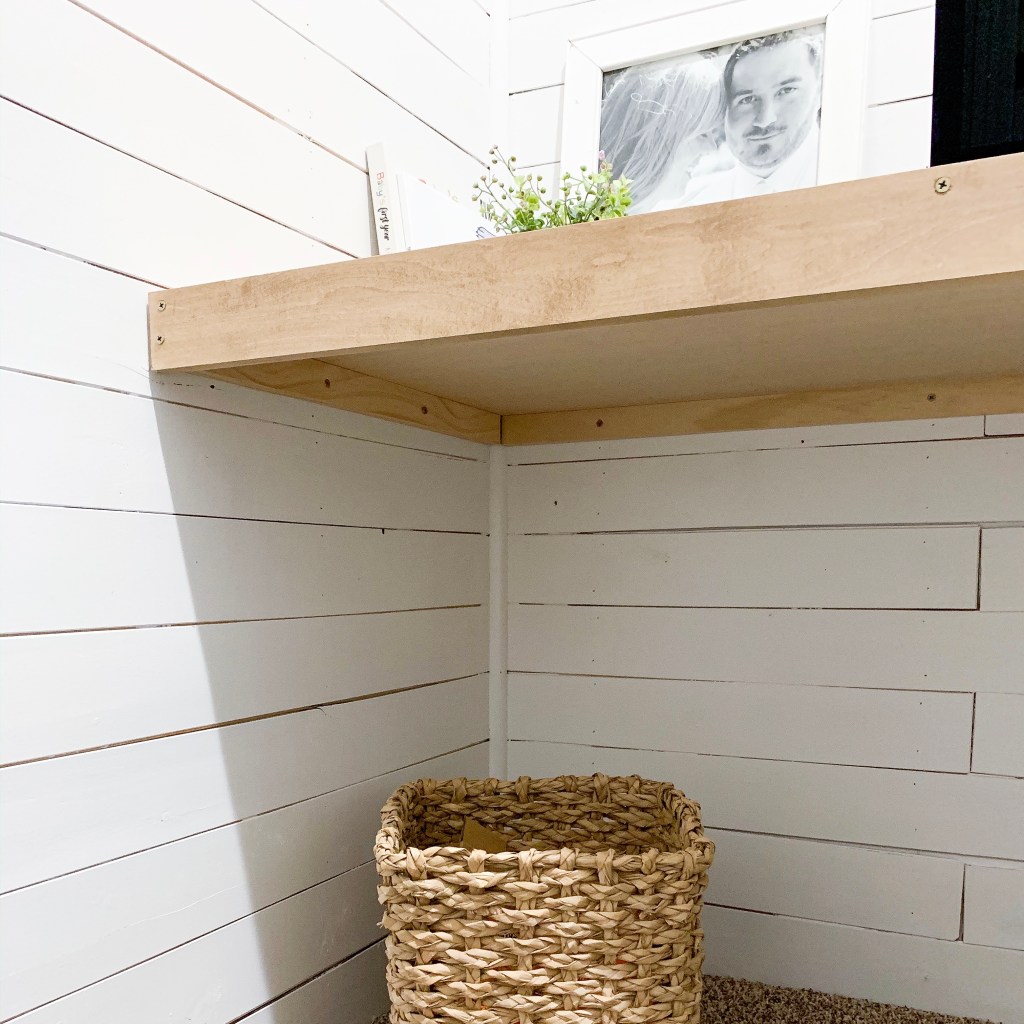
Next we set the plywood desk top onto the supports, and attached the trim board to the front. We also used wood screws here, but it would have looked much nicer with finishing nails – unfortunately we recently discovered that our nail gun is out of commission.
The last step for this desk (if you choose to do so) is to sand & stain. The natural wood color was pretty, but we decided to do a very light coat of Early American. I used a rag to apply it and immediately wiped off the excess. Obviously the more coats you apply, the darker the stain will become.
Once the desk was built, and the stain was (mostly) dry – it was time to decorate. More often than not, I tend to lean towards the “fashion over function” side of things (while my husband is the complete opposite) but I really wanted this space to not only be pretty, but be completely functional as an office space.
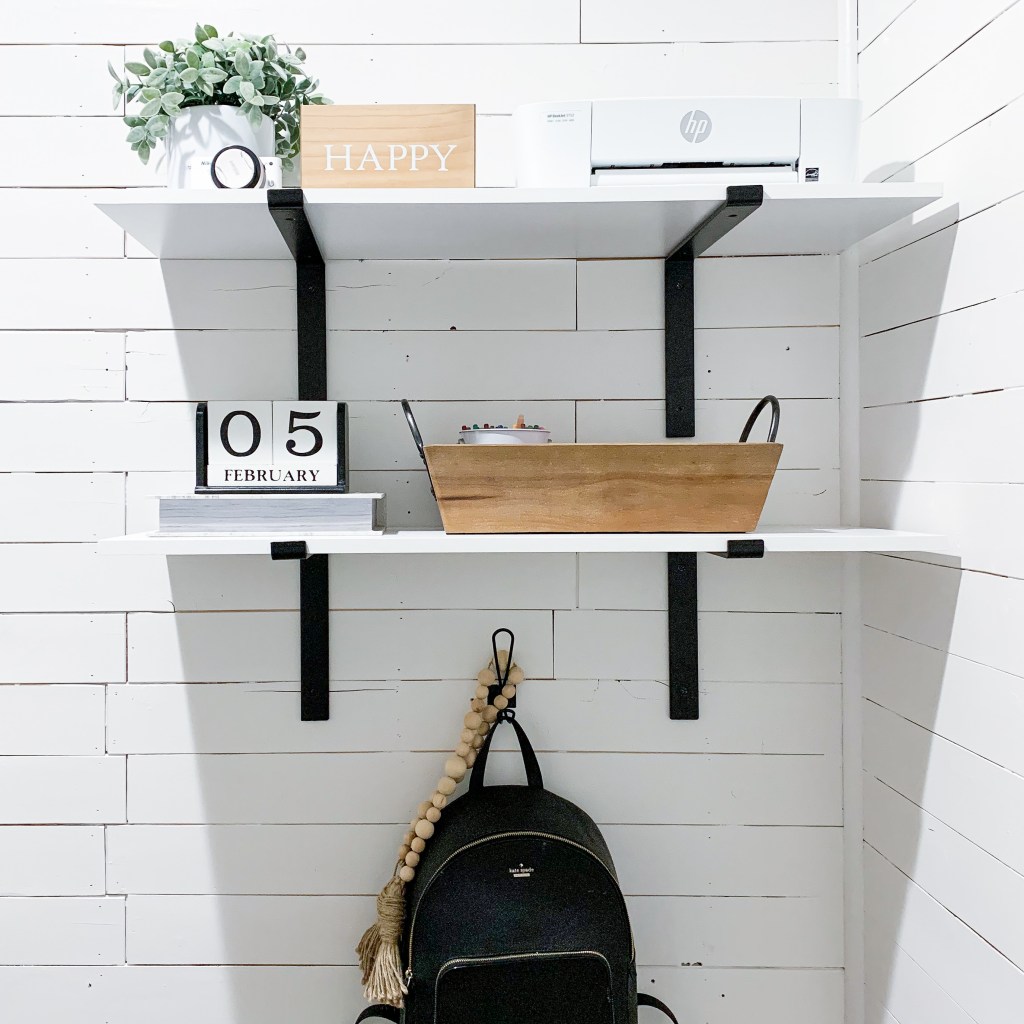
Shelving, a few hooks and some stylish baskets and bins provided much needed storage areas. We were able to repurpose a lot of the shelving that was already in the closet so that was an added cost saving bonus.
I found a few scrap pieces of wood in the garage and made the little display boards you see above. A few eye hooks and some wire and we now have the perfect place to hang artwork, pictures, bills – anything important!
I also repurposed this tiered cart from Ikea that we used in Camden’s nursery. A fresh coat of spray paint (it used to be teal) and now we have a spot to store printer paper, power cords, art supplies, etc.
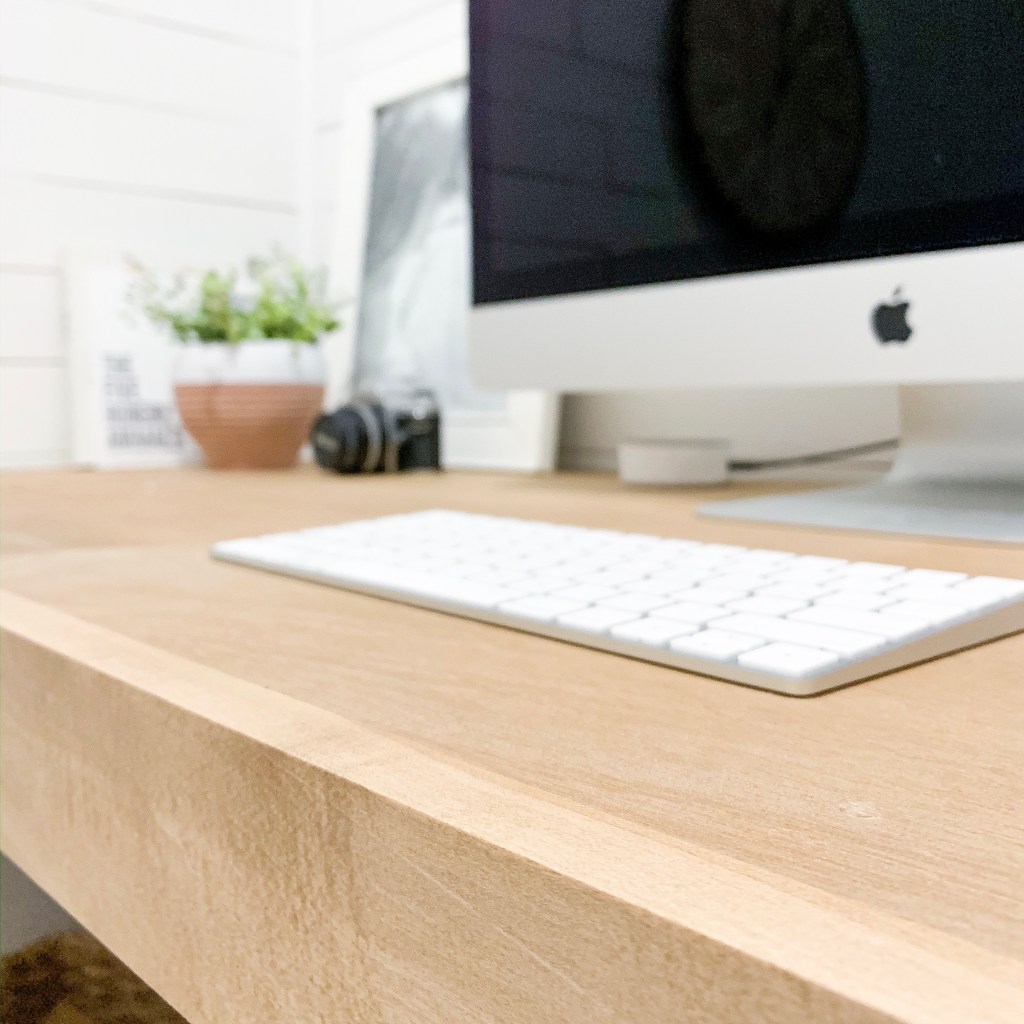
I’m so happy to have this space checked off the to-do list. It was a very simple and quick weekend project and we’ve already used it a ton! If you give this DIY a try, be sure to tag @houseon610th on Instagram.